Showing posts with label lunch. Show all posts

Wednesday, January 16, 2013

Bok Choy Saute with Scallions and Roasted Peanuts


Yeah, I've sorta' fallen in love with Bok Choy.

Paul has a coworker at his office who has actually named his computer, "Bok Choy." I'm jealous. I wish my computer was named Bok Choy. Th'stuff is so good. (I guess I'm too lazy to type the 'e' in the word, "the?")

I like this sauce much better than my stir fry sauce...it's safe to say it's totally been improved.

Like. Totally.

Paul loves it. I ate it for breakfast the first time I invented it. And felt awesome afterwards.

But, you don't have to eat it for breakfast if that totally wigs you out.

Totally.

We're always looking for stuff that's fast. Easy. Ready in less than 30 minutes. This fits the bill. Totally. I'll stop saying that.

If you make this recipe.

You won't regret it.

Over brown rice. To die for. Well, not really. It's not really death-worthy (does that exist, truly, in food world?). But. I like it. And I hope you do, too.

This saute is super-satiating; the combination of chewiness from the rice and mushrooms, and the crunch of peanuts and bok choy. The flavors come together with the sauce to create deep satisfaction.


People have sometimes asked me. What should they eat for lunch if they don't like eating leftovers from dinner, and they need something quick and healthy?

Ahem.

Make this.


Speaking of quick.

Some quick tips:

* I love buying mushrooms pre-sliced, and pre-washed. Saves me so much time and increases the possibility that I will actually use my mushrooms.

* Peanuts? Buy them already roasted, but with no salt.

* Bok choy?

Ah. Bok choy. A tip? Eat it every day. Yum.

* Flavors are enhanced when you use a cast iron skillet.

* Optionally, you could add some fresh mung bean sprouts. I just didn't have any at the time I made this.


* To make it more kid-friendly using pasta, simply follow the kid instructions (and pictures) found on my stir fry recipe page.

* Oh, and a tip on that, too. After cooking the noodles, rinse them with cold water until they are completely cold. You can even refrigerate them. The trick with sauteing noodles is to have them chilled/cold. It works much better to prevent them from getting gooey or slimy. Once the noodles start sticking to the pan, you know they are done.

Boy Choy Saute with Scallions and Roasted Peanuts
By Ashlee Crozier

Ingredients:

6 cups baby bok choy, sliced (including all the greens on the top!)
1.5 cups cremini mushrooms, washed, and sliced fairly thick
4 large cloves of garlic
1/2 cup scallions, or green onions, sliced, including white parts.
1/4 cup roasted peanuts, no salt
1/3 cup soy sauce, or tamari
1/3 cup brown rice vinegar
1 tablespoon agave nectar
1 -2 teaspoons sambal oelek, or other garlic chili paste (less if serving to kids, more if you like heat)
1-2 teaspoons toasted sesame oil (really enhances flavor, but 1 tsp will do the trick)
Optionally, you could add 1 cup of fresh mung bean sprouts (I buy mine from Whole Foods Market)


Instructions:

For optimal flavor, use a large cast iron skillet.

Preheat skillet (cast iron or nonstick) on high heat. Add sliced mushrooms and spread them evenly over the bottom of the pan. Let them saute for at least five minutes while you prepare/chop the other ingredients. Mushrooms contain quite a bit of water so you don't need to cook them in oil; once you see that they are starting to release their water (they will appear wet), stir the mushrooms occasionally, and let them cook an additional 5-10 minutes, but watch them carefully so they don't burn. If at any point the pan is starting to smoke, and the mushrooms are sticking to the pan, you can add water in small amounts (1/4 cup or less) so that the mushrooms continue to saute in water. You don't want the mushrooms to be soggy or water-logged, so take it real easy on adding the water.

When the mushrooms have released all their water and are starting to stick to the pan, add the soy sauce, wait about 30 seconds, and then stir. This will caramelize the mushrooms in the soy sauce to give them flavor, and the soy sauce acts as a nonstick agent. Add the rice vinegar, chopped garlic, agave nectar, red chili paste, and scallions, including white parts. Stir, let saute for about 1 minute, and then add roasted peanuts.

Reduce heat to medium, or medium low. Add chopped bok choy, including the green leafy tops. Saute for an additional 1-2 minutes, but you want the bok choy to remain slightly crisp, so don't overcook it. Remove pan from heat, and stir in the 1-2 teaspoons of toasted sesame oil. Toss to incorporate, and serve over warm brown rice.

For kid friendly, see my post on Asian vegetable pasta methods, using the same sauce as above and a fourth of the remaining vegetables.

Oh, and a tip on that, too. After cooking the noodles for your kids, rinse them with cold water until they are completely cold. You can even refrigerate them. The trick with sauteing noodles is to have them chilled/cold. It works much better to prevent them from getting gooey or slimy and sticking to the pan. Once the noodles start sticking to the pan, you know they are done. Remove from heat and serve.

Monday, January 14, 2013

The Perfect Pear; The Perfect Cleanse


I'm pretty sure I've had this green smoothie every day possible over the last two months.

Perhaps you have heard of Natalia Rose?

She is very famous for her raw, juiced green drink, called "Green Lemonade." A few of Paul's and my extended family members are currently doing a 100% raw juicing diet with green lemonade to successfully lose unwanted weight in a short period of time.

While I have also just discovered a new love for juicing lately; grapefruit orange juice, apple juice, carrot celery juice, etc. I have also discovered that kale does not juice very well, and most of it seems wasted.

As kale plays a major role in green lemonade, it seems tragic to see such small yeild of juice from such a power-packed nutrient, and almost heart-breaking to see so much kale thrown away into the trash after it has been juiced. (Even using the very popular and high quality Breville juicer; my personal fave).

I prefer to blend my greens, whole, to enjoy the whole plant, and this green smoothie is the closest "mime" to green lemonade that I have come across (thanks to my sister!).

Over Christmas break, it seemed that Paul, the kids and I were able to dodge a lot of "illness bullets." We had a wonderful time visiting family and friends, but it seemed like everyone was getting hit really hard with some kind of bug. Through it all, we somehow avoided getting the stomach flu, Norovirus, the cold, and other such ailments.

We thought we were out of the woods.

Until I got a sinus infection, which I have been prone to getting since I was little.

Did you suffer illness during the holidays? Or perhaps, you interacted with one too many sweets, and are ready for a cleanse. Maybe your Resolutions for 2013 include weight loss.

This Perfect Pear really is the perfect cleanse.


Because:

*It packs in a lot of greens
*It packs in a lot of cruciferous vegetables...
*...and cruciferous vegetables are known for their high nutrient density

According to Joel Fuhrman, and his book, "Super Immunity," if you want to avoid illness, or do everything you can to speed your recovery, you will consume a lot of cruciferous vegetables.

Examples of Commonly Found Cruciferous Vegetables:

* Kale
* Bok Choy
* Broccoli
* Cauliflower
* Collards
* Cabbage

Joel Fuhrman also says that in order to get the maximum benefit from cruciferous vegetables, it is best to have them lightly steamed, or raw, but pureed or finely chopped so that your body has easy access to the nutrients.

The Perfect Pear Smoothie has both kale, and bok choy, in their raw form! All blended up for a quick infusion of power-packed nutrients.


It's not super-sweet, but packed with greens. Cleansing is the idea, or good for weight loss or for just wanting to feel great. So don't expect it to taste like candy...However, despite the fact that it's not overpoweringly sweet, it is just about the juiciest green smoothie I have ever tasted. Pleasant, energizing, and very satisfying.

You can adjust the sweetness levels easily to your taste by adding more pear, or banana, or both.


The Perfect Pear
Adapted from Diana Stobo

Note from Ashlee: I found the most beautiful and delicious red Bartlett pears at Costco, that I have ever had. They were very large, and very sweet. I can't find them at Costco anymore, and seeing as how pear is the main sweetener/taste in this smoothie, I recommend you use either very ripe Bartlett or very ripe D'anjou pears. If they are small use two pears.

Ingredients

1½ cups water
1 large Bartlett pear, cored and stemmed (or 2 smaller pears, D'anjou pears work well!)
1 baby bok choy
3 celery stalks
3 large romaine lettuce leaves
3 large kale leaves (I add more like 6-8 leaves because I love greens)
1 banana
Juice of 1 lemon
1 cup of ice (optional, but I think smoothies taste much better when cold, and ice helps blenders like Blendtec blend more efficiently.)

Directions

Add to your blender in the order shown, starting with water and ending with ice. Blend in high-speed blender for 60 seconds. Serve immediately.


**********

What I do to get a good picture sometimes!

While I was carrying the cutting board back into the house (through the snow) after this smoothie's photo shoot, the lemon started rolling off the board. I used my elbow to catch the lemon, and down went the green smoothie.


Luckily, I was able to use my torso as a lid for the top of the green smoothie and able to salvage most of it, but not without suffering some loss.

I was trying to get ready for our trip to Utah, so I just quickly wiped down my shirt and pants, and wore them during packing. Seeing a green, round stain, Essie and Paul both asked, "What did you get on your shirt?!"


Friday, January 11, 2013

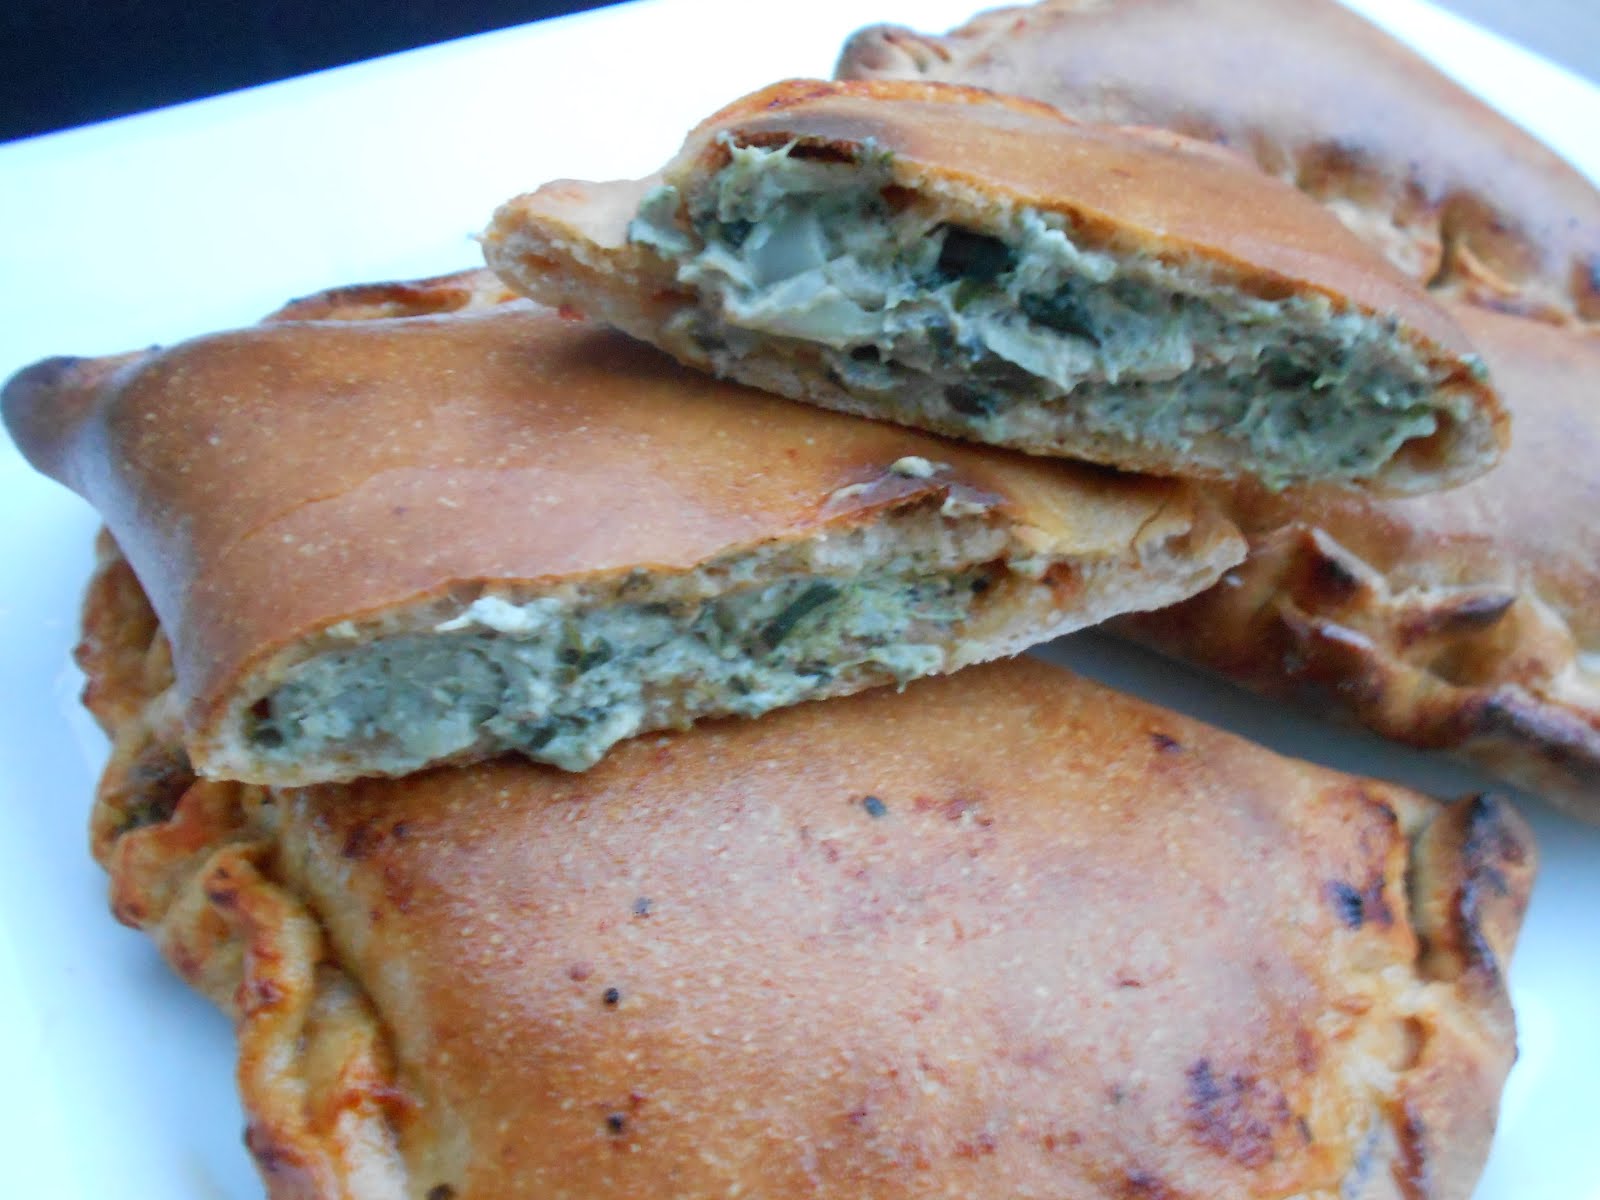
Family Friendly Calzones...Or Pizza Pockets?


Cheesy. Creamy. Popping with flavor and pizza zang (my new word). Stuffed with healthy ingredients. The flavors meld together with warm pizza crust and marinara sauce.


It's been over three months, I am sure, since you asked me to make perfect these.

I've been thinking of your request, on and off, the whole time.

At first, it didn't seem like a difficult task. I had a basic recipe on hand that I had used for Calzones before.

But then.

I got to work on it.

And I realized I needed to rethink the recipe. The one I had on hand was good, but I felt that it was really not good enough. I wanted my kids to love it. Your kids to love it.

I basically, really, just wanna' see it gobbled up.

You've waited a long time. Never complained. Many times your comments, compliments, and encouragement have kept me going. You are a wonderful friend.

I know the challenges you face with trying to get your kids and hubby to really love eating plant based. Ah. Don't we all face some level of this challenge? Trying to get our families to enjoy eating healthier foods?

So I didn't take your request lightly. These Calzones needed to meet some high standards. I poured over books, brainstormed, consulted with other cooks.

Then I made a list of standards that these little Pizza Pockets had to live up to.

* Made with everyday, recognizable ingredients
* Kid-approved (and LOVED!)
* Nutrient dense (chock-full of healthy stuff)
* And still taste good
* No tofu (really? Tofu in my pizza? No thanks)
* Suitable for guests
* Easy (not an all day experience...or so-called, "labor of love")
* Only 2 or 3 main steps
* Variation-friendly (I provide a list of sauteed veg that would taste great as an add-in, or variation for toppings for the filling)

The standard of "No tofu" turned out to be a big deal. Most of my favorite cookbooks had recipes for Calzones, but inevitably, all of them used tofu as the main ingredient; throwing in a bit of spinach here and there for variety.

I just can't imagine handing an omnivore a tofu stuffed calzone, or even putting one in front of myself, and expecting myself or my lovely omnivore guest to want to eat said calzone. I like variations on tofu...but in my pizza???

And so. I have not forgotten you.

In fact, as soon as the right idea finally came to me yesterday, I was so excited I had all kinds of butterflies in my stomach. I was finally going to deliver what I had promised. I cannot tell you how badly I have wanted this moment to come.

Easy, home-made, pizza pocket goodness.


Have I told you lately? How much I care?

Because you and your friendship are SO. SO. WORTH IT!

The crust can be homemade, made in a bread maker, or store-bought. The marinara, or pizza sauce, likewise can also be homemade or store-bought. I use store-bought for ease and simplicity.

The filling takes as little time as it takes to put together a green smoothie.


With similar steps, and a short baking time. It contains 2 cups of artichoke hearts, and 2 cups of spinach. 3/4 cup of cashews, blended with lemon juice and seasonings make up the cheesy part of the recipe.


I will first show pictures, with detailed instructions and tips, and then show the posted recipe with the same detailed instructions below, for ease of keeping the information all together so that it can be copied, pasted, and printed. (I wish I had printable recipes option!)

The three main steps?

1.) Make pizza dough
2.) Make Creamy Artichoke Spinach Filling/Dip
3.) Put it all together and bake in the oven for 12-15 minutes, at 500 degrees.

Let's get started!

Assembling your Plant Infused Calzone:

When pizza dough is complete/ready, divide in half evenly. Rolling out only half of it at a time. Make sure to flour the surface so the dough doesn't stick.

After rolling/spreading it out into a smooth circle, I cut mine with a knife, on a smooth surface (my cutting board), into four equal parts.


Spread with marinara (or pizza sauce). I use Prego brand; use your favorite, or home-made.

Keep the sauce toward the center of the crust. You want dry edges so that they will fold and pinch together to seal the pockets/calzones.


Then, put about 3-4 tablespoons of pre-baked spinach artichoke filling on each calzone, again keeping it toward the center so that you have dry edges.


At this point, I would recommend adding in extra vegetables on top of the filling for the veg loving people in your life!

Some VEG Toppings that I think would work well:

* Sauteed, sliced mushrooms
* Sauteed, thinly sliced red onions
* Sauteed, thinly sliced red bell peppers
* Samuel loves black Olives, chopped or sliced
* Essie loves black beans in her pizza
* Roasted Green Chile...maybe? Sprinkled on top?
* Additional steamed, or sauteed, chopped spinach

Fold each calzone in half, bringing the two, straight matching edges together.

Then fold the matched edges; the bottom edge over the top edge, pinching the edges together at the same time, so it looks like this.


Just a tip: pinch really hard. That way it stays together. It's actually okay if it splits open a bit during cooking.

After the pocket is sealed, press gently down on the filling so that it fills up all spaces inside the pocket; evenly distributing the filling for savory, cheesy goodness in every bite.

With a spatula, and your hands, carefully transfer the folded, sealed calzones to a lightly oiled or nonstick baking sheet. You could probably also use parchment paper as a nonstick surface.


Repeat with the other half of the pizza dough.

Bake in a 500 degree pre-heated oven, for 12-15 minutes, until golden in color. Remove from oven, and optionally brush the tops with nondairy butter. Let cool for about 10 minutes.

SERVE, WITH A SIDE OF extra MARINARA SAUCE FOR DIPPING/DUNKING!


Spinach Artichoke Calzones
Modifications by Ashlee Crozier

Don't be frightened by the detailed instructions!

These are really, really easy, and quick to make. Especially if you have pre-made pizza dough, which, I do not frown upon.

Hey, make life easier.

Nor do I frown upon the use of store-bought marinara sauce. (I don't provide a recipe for marinara sauce, but you will need some for this recipe).


Pizza Dough for Bread Makers
(makes 2 lb size)

Ingredients:

1 1/2 cups warm water
2 TBSP olive oil
2 tsp. salt
2 cups unbleached, all purpose flour
2 cups, scantly measured, white whole wheat flour
3 tsp. sugar
1 tablespoon gluten flour (optional, helps the dough to rise and be fluffier)
2 tsp. yeast

Combine all ingredients in your bread-maker, in the order listed. Set the bread-maker to the "Pizza Dough" setting (about 55 minutes) and push start.


Creamy Artichoke Spinach Dip
By Dreena Burton

A delicious, dairy-free artichoke and spinach dip made without any cream or cheese substitutes, and also without any oil.

Note from Ashlee: My kids love this as their filling for calzones, or as a dip. Either way, they gobble it up.

Ingredients

(serves 5-6)

3/4 cup raw cashews (unsoaked)
3/4 cup plain unsweetened non-dairy milk (I like almond or soy, but your choice)
2 1/2 - 3 tbsp freshly squeezed lemon juice
1-2 medium-large cloves garlic (use less/more to taste)
3/4 tsp sea salt
1/2 tsp dry (ground) mustard
freshly ground black pepper to taste
2 cups frozen artichoke hearts, partially thawed (helps for pulsing in blender)
2 cups (loosely packed) spinach leaves (I used frozen, heaping 2 cups, to get in more spinach)

Instructions

Preheat oven to 425. In a blender, first add cashews, milk, lemon juice (I like the full 3 tbsp for tanginess), garlic, salt, dry mustard, and pepper. Blend until very smooth. (If using Blendtec (purrrrr) or other high-powered blender, this will only take a minute or so. If using a standard blender, keep blending until very smooth. Add artichokes and spinach and just PULSE through. Do not fully blend, keep some chunky texture! Transfer to an oven-proof baking dish, and bake for 17-20 minutes.

Remove and say ‘ahhhh’.

Assembling your Calzones:

Make Pizza Dough. While the dough is rising, prepare and bake Creamy Spinach and Artichoke Filling/Dip.

When dough is complete, divide in half evenly. Rolling out only half of it at a time, be sure to flour the surface so the dough doesn't stick.

I cut mine with a knife, on a smooth surface (my cutting board), into four equal parts. Spread with marinara (or pizza sauce); about 2-3 tablespoons of sauce for each calzone. I use Prego brand; use your favorite, or home-made. Keep the sauce toward the center of the crust. You want dry edges so that they will fold and pinch together to seal the pockets/calzones.

Then, put about 3-4 tablespoons (you can experiment with different amounts, to find what works for you) of pre-baked spinach artichoke filling on each calzone, again keeping it toward the center so that you have dry edges.

At this point, I would recommend adding in extra vegetables on top of the filling for the veg loving people in your life!

Some VEG Toppings that I think would work well:

* Sauteed, sliced mushrooms
* Sauteed, thinly sliced red onions
* Sauteed, thinly sliced red bell peppers
* Samuel loves black Olives, chopped or sliced
* Essie loves black beans in her pizza
* Roasted Green Chile...maybe? Sprinkled on top?
* Additional steamed, or sauteed, chopped spinach

Fold each Calzone in half, bringing the two, straight matching edges together. Then fold the matched edges; the bottom edge over the top edge, pinching the edges together at the same time, kind of how you would seal a double pie crust.

Just a tip: pinch really hard. That way it stays together. It's actually okay if it splits open a bit during cooking.

After the pocket is sealed, press gently down on the filling so that it fills up all spaces inside the pocket; evenly distributing the filling for savory, cheesy goodness in every bite.

With a spatula, and your hands, carefully transfer the folded, sealed calzones to a lightly oiled or nonstick baking sheet. You could probably also use parchment paper as a nonstick surface.

Repeat with the other half of the pizza dough.

Bake in a 500 degree pre-heated oven, for 12-15 minutes, or until golden in color. Remove from oven, and optionally brush the tops with nondairy butter. Let cool for about 10 minutes.

SERVE, WITH A SIDE OF extra MARINARA SAUCE FOR DIPPING/DUNKING!

Wednesday, October 17, 2012

Cheesy Potato Bar & Easy Pumpkin Molasses Beans


I'm not much of a chips person. Never have been. I am more of a potato person. My family loves chips, so sometimes I serve nachos. But I would much rather have my refried beans on top of chopped romaine lettuce. Not because I know it's healthier, but because I really am not a big chips eater.

I love a good potato. Never get tired of them. Baked, steamed, boiled, sauteed, there are so many ways to eat a potato.

I got caught up in making a fancier version of apple crisp yesterday, and realizing I didn't have a lot of energy left to make dinner, I decided to throw some potatoes in the oven.

They could bake, while I finished the apple crisp.

I am so glad I don't have to rely on dairy cheese to please family and friends. Thank you, basic cheese sauce.

That everyone seems to just love.

I was gonna' make a fancy pumpkin molasses baked beans recipe. There was too much going on. So I opened a can of organic baked beans, instead. Threw in some pumpkin to make it festive. Adjusted the seasonings to taste.


My pictures aren't fancy today.

You know those days where everything around dinner seems to be chaos? Where everyone's needs are suddenly voiced, and there are a million things that need to be taken care of, all at once?

Well, last night was one of those nights. It was busy, but I loved it. My sister loved it. We grew up in a family of seven kids, so a little bitty chaos kinda' feels like home.

Needless to say I was lucky to get a picture. At all. Mom world.

I served up some potatoes for my kids, and poured cheese sauce on top. After fixing up my own plate I looked up. I couldn't believe it.

Their potatoes with cheese had been completely devoured. I had to smile, albeit an inward smile so they couldn't see that I was happy. Children are always suspicious if Mom is happy that they ate something.

It must be healthy.


For the Baked Potato Bar, you will need:

2-3 baked potatoes for each person (I baked about 12 potatoes, but I wish I had baked more. We are pretty good at eating them for leftovers.)
1 Recipe Basic Cheese Sauce

Steamed vegetable, some good options are (pick your favorite(s)):
Broccoli
Zucchini
Peas
Corn
Green beans

Optional Toppings:
Green chili
Tofu Sour Cream
Salsa
Green onions, chopped
Red pepper flakes, if you like it hot


For the Easy Pumpkin Molasses Baked Beans:

1 15 oz can of organic baked beans (check to make sure it is vegan)
1 tbsp ketchup
1 tbsp maple syrup
1/3 cup pumpkin puree

Heat on the stove and mix together well. Serve hot.

******

A trick I learned with baking potatoes.

I used to buy those little pre-cut foil pieces, until I ran out. I didn't use them enough, so I didn't want to buy them again.

I do not like tearing foil. I do not like wasting excess foil. Maybe that's just me.

If you take a large piece of foil, and fold it into fourths, it creates a crease.


Tear along that crease and it will tear evenly. Ta-da! No wasted foil, and perfectly shaped little foil squares.

Wrap your potatoes in the foil squares, and place directly on the middle oven rack. Bake for about 45 minutes at 400 degrees. I used gold potatoes. If they are a larger kind of potatoes, like russet, they may need to bake for longer.

I thought I would go ahead and add the Basic Cheese Sauce recipe here, so you wouldn't have to go to other pages to get it.

A potato bar is another great way to use it.


Simple Cheddar Cheese Sauce
From Neva Brackett's, "Seven Secrets Cookbook."

Note From Ashlee: I've had quite a few taste testers try this cheese sauce. Family and friends have all stated that it tastes exactly like the dairy nacho cheese sauce. Or better. It's ALWAYS been gobbled up. Sometimes I have to go back and make a second batch. Amber has incorporated it into her home, and met with great success. Her kids STILL don't know it's dairy free.

If you follow the directions EXACTLY, you will find yourself with a really good cheese sauce. Best for Mexican types of dishes, but also good on kids' pizza.


Ingredients:

1 cup raw cashew nuts
2 cups water
1/2 large or 1 small red bell pepper, or 1/4 cup canned pimentos or roasted red peppers (I ALWAYS use the jarred, roasted red bell peppers, also called pimentos.)
1 1/2 teaspoons salt
2 teaspoons onion powder
2 tablespoons food yeast flakes (nutritional yeast)
1/2 teaspoon garlic powder

Blend smooth (about 2 minutes) and then bring to a boil, stirring until thick. Use for pizza, lasagna, burritos, etc.

Lite Cheese Option: Use only 1/2 cup cashew nuts plus 1 tablespoon cornstarch.

*Makes 3 Cups*


******

Total side-note.

Remember how we kept trying to get a decent appraisal on our house so we could buy the old cottage with 7 acres across the street? We switched banks, and got a great appraisal. We close with the bank on Friday.

Paul came home from work yesterday and showed me a typed note that had been fixed to the cottage gate.

It was from an "area scout." She wrote that they are filming a movie with Ed Harris and Eva Longoria, and that our cottage was the perfect location. Left her number, and asked that the owner of the cottage would please call her.

So Paul called her. $1,000 dollars a day, they want to give us. To use the property for five days.

I am not even kidding. No joke.

Monday, October 15, 2012

Pumpkin Mac


Hello, Hello!

I have been anticipating Monday with, well, much anticipation! I am a little excited to bring you this recipe.

All things pumpkin and apple in my kitchen, lately. And it has been wonderful. I'm gonna' share some of that kitchen wonderful, with you.


Starting with Pumpkin Mac.


Pumpkin in macaroni and cheese? I was scared at first. Worried. Added only a little bit of pumpkin puree at a time, and then did a little bitty taste test.

So super-stoked! It was quite delicious.

I should mention that it does not taste like pumpkin pasta. It tastes like a rich, slightly sweet, macaroni and cheese. I have tried a lot of different plant-based macaroni and cheese recipes. This one is easily my absolute, go-to favorite. My kids agree.

I am trying really hard not to rant and rave about my own recipe here. But I did have quite a few taste testers at my house over the weekend, and they couldn't get enough of it. They were not vegans, either. They had just had dairy cheese that day.

Paul, Essie and I, all agree that it is better than my butternut squash macaroni and cheese. But you will have to decide that for yourself.

And you know, it was time to shake things up a bit.

Variety is the spice of life.


Some definite pros about this recipe here. One is, well, I think you're really gonna' like it. And two, it's quite festive and healthy.

But how about some busy chef benefits here, huh?

The cheese sauce takes less than 9.674 minutes to make.

No cooking butternut squash. Just open a can of pumpkin puree, measure it out, and throw in the blender with your cheese sauce ingredients, and ooooh la la.

Dinner in less than 10 minutes. Or lunch. If you use brown rice pasta shells, it may take longer for your pasta to cook than for your sauce to be ready.

And. Some of us had quite the difficulty buying butternut squash off-season. Even in trying to find it in the frozen vegetable section. Pumpkin puree may be more widely available. Or at least gives us another option. Yay!

So, when you find yourself with 9.674 minutes, I hope you make this recipe.


Happy Monday, and Happy Eating!!


PROJECT VEGAN KIDS
VEGAN FAST FOOD!


Pumpkin Mac
By Ashlee Crozier

Note from Ashlee: I don't know why I always make my mac n cheese with penne pasta. As with the butternut squash macaroni and cheese, I do not recommend you use whole wheat pasta. I do recommend white pasta. Especially for transitioning children. Make sure you carefully measure everything with exactness, otherwise I don't know how the recipe will turn out.

Ingredients:

4 cups dry macaroni (use whole grain pasta if possible, I like brown rice pasta shells)
1 cup full-fat coconut milk from a can
2 cups water
1/3 cup nutritional yeast flakes
3 teaspoons salt
1 cup (scantly measured) raw cashew pieces
1/4 cup, or 1/2 of a roasted red bell pepper (pimentos, packed in water)
1 tablespoons lemon juice
1/4 cup cornstarch
1 teaspoon onion powder
3/4 cup 100% pumpkin puree (not pumpkin pie mix, use up to 1 full cup if you choose)

Directions:

1.)Cook pasta according to package directions.

2.) Place all the ingredients in your blender, except of course, for your pasta! Taking care to measure everything carefully. Blend on high until very smooth, and little to no grittiness is felt when you rub the sauce between two fingers. You may need to run your blender through a couple of cycles.

3.) Drain your pasta and return to cooking pot.

4.) Do not add all of the sauce to your macaroni and cheese! We all have different tastes and some of us like more cheesy pasta than others. Pour blended mixture, a little at a time, into hot, drained macaroni until you have reached the cheesy texture you would like. I probably added about two cups of sauce to 1 pound of pasta. You may want more. Cook together, stirring gently and constantly, until thick.

5.)Freeze remaining sauce immediately, in a freezer-safe Ziploc bag. Unless, of course, you are going to eat this again for your next meal. With more cooked pasta. I'm not against it. (The sauce only lasts about 2-3 days in your fridge, don't wait for it to start getting bad first, and then freeze it. I have made that mistake before.) To thaw, simply place in a sink-ful of very hot water for about 10 minutes, then heat it in a stock pot to thicken, add pasta.


[UPDATE 10 25 2012] VARIATION: Rachel, a reader and friend, has been very successful using an entire 15 oz. can of coconut milk and an entire 14.5 oz can of pumpkin puree. I tried it too, and it tasted quite good. This version is a bit more bland, (not such strong flavors) and works well with small children who like more bland foods. It tasted closer to boxed macaroni and cheese (kraft stuff) and less like homemade macaroni and cheese. I like both variations, and couldn't pick a favorite, but Paul's tastes prefer my original version. You are welcome to try either and see what is your favorite. This variation makes a ton of sauce! Be prepared to freeze some in Ziploc gallon freezer bags.


*****

What festive food would you like to eat next? I will post it tomorrow!

Pumpkin Pie Smoothie


Apple Crisp
(Gonna' do a new photo shoot for this one!)


Pumpkin Bread


Thursday, October 11, 2012

Fried Tofu // Incorporating Soy in Your Child's Life


Transitioning to a plant-based diet was very difficult for my kids. At first. Especially for my oldest, Essie.

Another one of the unforeseen negative side affects of trying low carb, was that I had trained her palate to enjoy meat, cheese, heavy cream, eggs, and salmon in particular.

It was hard for her. She struggled. In one week I had completely changed her menu. No eggs for breakfast, meat and cheese for lunch, and hot dogs for an afternoon snack. No salmon for dinner.

Looking back on that I shake my head. Literally. What a SAD menu. Where were the whole grains? The fruit, vegetables, raw nuts, beans? No where to be found.

What a tragedy.

But unlike dramatic plays, this tragedy has a happy ending. Or beginning. Depending on which way you look at it.

It's called tofu. Soy. If prepared and presented the right way, kids love. Of course, I try with every meal to incorporate as many nutrient-dense foods as possible for my children, but soy foods really help them get the calories they need. I do not use soy as a replacement for other nutrient dense foods, but rather, in addition to them -- as a side.

The first time Essie tried crispy tofu, I saw the gears turning in her head. Excitement. And I could see that she decided that this eating veg thing wasn't so crazy after all. She could do it. Enjoy it.

So, I thought I would write about some of our favorite soy foods. (See my and Dr. Joel Fuhrman's opinion on whole soy foods, here.)

Starting with the basics. Soy milk. My children's favorite non-dairy milk, it is creamy, a little bit fatty, higher in calories than almond milk, and delicious.


Organic, unsweetened, enriched with calcium, vitamins A and D, and a good source of Vitamin B12. (All vegans need supplementation with vitamin B12.) They love it poured all over their breakfast oatmeal, cereal, or Mighty Tasty Hot Cereal. They also drink it straight out of a cup, with their meals, or use it for dunking cookies.

Next would have to be soy yogurt. I'm tellin' ya we are all addicted to this stuff. I have tried other yogurts -- almond, coconut, etc, and they cannot compete with the flavor or texture.


I hope you get a chance to go to Trader Joe's and try soy yogurt like this. For $2.49 per large container, it's affordable and every week I buy about 4-5 of these. Seriously. Addicted. It contains live probiotic cultures; helpful for the digestive system. This yogurt sells fast at TJ's so go during the week, especially in the morning to make sure you get some. Just a little trick I learned. It's always gone on a Saturday evening.

If you don't have a Trader Joe's, Whole Foods Market also carries Silk Soy Live! yogurt, large container for about the same price. I don't find it to be as tasty as TJ's yogurt, but remember that you can always add some sugar or other flavorings (maybe some fruit jam?) to yogurt to make it tastier.

We eat it as a snack, and I also use it to replace oil in my baked goods (use half the amount than oil). Because it contains fat, and is quite thick, I think it tastes much better as an oil replacement than applesauce does. Kids need fat. I am convinced. They want it, crave it, love it.

Essie had first tried crispy tofu at a restaurant. They deep fry it. Wow. Is this stuff good! I am working on going to a Thai Diner and asking to buy their deep fried tofu (sounds terrible, I know, but kids need fat) directly from them. No way am I buying a deep fryer.

Until then (I'll let you know how that turns out) I love using pre-baked, organic, seasoned tofu. Trader Joe's sells three different flavors; BBQ, Savory, and Teriyaki. I am sure other health food stores carry similar products. I just haven't looked because we are happy with TJ's.


What I do: open a package of pre-baked, seasoned tofu, and slice them into cubes or bite-size slabs. I try to maximize the surface area so that it can get toasted well and become pretty crispy. Get a nonstick skillet, and pre-heat to medium-high heat. Throw cubes in the skillet without any oil, and brown on both sides. Makes it crispy and warm. Serve with ketchup, BBQ sauce, ranch dressing, or their favorite sauce. My kids love this, and clamor over who gets the last piece.


For Sandwiches: Take a block of pre-baked, seasoned tofu, and either chop it fine with a knife or pulse it in the food processor until fine. Immediately press it into hummus that has been spread over some whole grain bread. The tofu loses moistness if you wait too long, and doesn't stick in the hummus as well. Spread a second slice of bread with hummus, and put the two pieces together to form a sandwich. I try to press/compact as much tofu in the sandwich as possible.

I also love using the Teriyaki tofu in our VERY favorite Thai Noodle dish.

Kids love ice cream, creamy treats. I mostly make banana ice cream for them in my food processor, but I also buy soy ice cream, and soy ice cream novelties.


One of their favorite treats is chocolate milk. Pictured is the almond chocolate milk because it was in my fridge, but soy chocolate milk is also commonly sold (even at Wal-Mart!) and is very delicious!


Not every child enjoys meatless hot dogs. I don't think they taste fantastic. But for some reason, my kids really like them. It helps to have them on hand for immediate snacks. Just follow the directions on the back of the package for the best results in preparation.


Tofurky, a sliced deli meat, is also available (pictured at the very top). I do think that this stuff actually tastes good. Pair it with mayo or some hummus your kids like, and you have a sandwich. Or, if you are like Samuel, you munch on it plain. Samuel and Megan love it. It is a more refined food, so I do avoid serving it to them, and strongly prefer to serve them organic tofu.

Sprouted organic tofu. Or sprouted organic tempeh (another tofu product). Fried my way. The Dreena Burton way. Yummy!


What I do: Remove tofu from package, and carefully pat/press dry with paper towels. Cut into cubes, and marinate for 20 minutes. Toss in corn starch. Fry in 3 tablespoons of oil on high heat. Serve with ketchup.


PROJECT VEGAN KIDS
VEGAN FAST FOOD!
(If you marinate the tofu/tempeh for 15 minutes or less.)


Pan-Fried Tempt-eh! Or Tofu!
By Dreena Burton, from "Eat, Drink, & Be Vegan."

Makes 5-6 servings as a side dish or nibbler, or 3-4 servings as an entree.
Wheat Free
Gluten Free if you use tofu and corn starch

Note from Ashlee: Although this recipe is for tempeh, my children find both tofu and tempeh very appetizing. I have tried baking my tofu with seasonings and my kids and I do not enjoy it. They like it crispy (because there is so much oil, I try not to eat this!). These are a great replacement for the chicken nugget, when served with ketchup or other dipping sauce. See Dreena's note below, for tips on using tofu in this recipe.

Ingredients:

1 1/2 tablespoons rice vinegar or apple cider vinegar (for tofu, use balsamic or red wine vinegar!)
1 1/2 tablespoons tamari (soy sauce)
1 package (8-oz/227-g) tempeh, or 1/2 package (15-oz) extra-firm tofu, patted/pressed dry with paper towels.
3-4 tablespoons cornstarch (or arrowroot, but I found arrowroot to be gummy when fried)
3 tablespoon coconut or olive oil
lemon wedges, for serving (optional, I never add this part)

Directions:

In a large, shallow dish, mix vinegar and tamari. On a cutting board, cut tempeh about 1/2 x 3 1/2-in (1x9-cm) slices. Add tempeh to vinegar-tamari mixture to marinate, turning slices to absorb marinade on both sides. If possible, allow tempeh to marinate for 20 minutes or more in the refrigerator.

In a large dish, spread cornstarch (or arrowroot powder). Dip each tempeh slice in cornstarch, gently tapping to remove any clumps (some areas will have a thicker layer of cornstarch, this is okay.) In a small to medium size non-stick frying pan on high, heat oil. Add tempeh slices and fry on one side for 4-6 minutes until golden brown and crispy. Flip over and cook for 4-5 minutes until crispy, adding more oil if needed. Flip again if needed. Remove and serve immediately with a squeeze of lemon wedge (for adults) or with a favorite dipping sauce...be sure to eat them while still hot.

Note from Dreena: You can substitute tempeh with tofu (I DO!) in this recipe: use 1 pkg (12-oz/350-g) fresh extra-firm tofu, cut into 1/4-1/2 inch thick squares and press between paper towels to remove excess moisture, then marinate it as you would the tempeh (using 2 tbsp Tamari).

This is so good, even my normally "tempeh averse" husband loves it. I originally created the recipe using tofu, which is an excellent variation. Either way, this Tempt-eh! is a little crispy, a little tender, and a whole lot delicious. This appetizer can also be served in an entree with noodles or a whole grain.

Friday, August 17, 2012

Vegan Fast Food; The Method

This is Dish 1. I added seasoned quinoa and some coconut milk for a truly authentic taste of India Curry.

To my great horror yesterday, the fireplace in my living room was painted a bright purple, with shades of pink. I had asked the fix-it men to paint it a dark brown.

Somehow the color had gone completely awry.

But I couldn't communicate with them any further because I don't speak a lot of Spanish, and Paul was at work (he's the fluent Spanish speaker around here!)

My dilemma is that the appraiser comes to our house today. If I ask our workers to paint it a different color, then the fireplace will not be completed entirely before the appraiser arrives.

Installing and completing this high efficiency fireplace has been a big expense, and it is actually the way that we heat our house for the snowy winters up here in the mountains. If the fireplace is "under construction" then the appraiser cannot count it as adding additional value. And I know we already talked about the need for our house to appraise really high in value in order to buy the additional 7 acres surrounding our property.

But I really don't think I can stand to look at a purple and pink fireplace...once they put on the diamond finish, which acts as a sealant, it will be really hard to paint the fireplace a different color. There is something so final about a diamond finish. It's these kind of decisions that have me biting my fingernails and calling everyone I know with sense of artistic color (thanks, Mom!) to help me figure it out.

It's also in these situations that I really don't have a lot of time to cook. Something about transitioning to whole foods can feel like cooking is all consuming. Although I LOVE cooking, I really don't want to spend my whole life in the kitchen. More and more, "fast food" is becoming a necessity. Today I need to spend my time vacuuming up spilled granola, mopping up chocolate milk (don't worry, it's nondairy!), washing little fingerprints off of walls, and tidying up little hands' toys and books.

A few weeks ago I ran across this idea by Jeff Novick that is more of a method teaching how to make a meal from your head instead of always having to rely on a recipe every single night.

This is what I need. It's starting to become how I think. If I am in a panic or in a rush, I can't be looking through recipe books for a quick dish.

I know what you are thinking. It's not perfectly safe to learn methods instead of precisely following a recipe. It may not turn out as well as I want it to. I would argue that most of us are better chefs than we give ourselves credit for...and getting to know a few methods will increase our cooking abilities.

I recommend you watch some of his short excerpt films on youtube.

This movie is what I especially recommend:


I LOVE his personality. He is funny, and honest.

Although quite simple, (I almost said to myself, "No, Duh!")

His main idea is:

1.) Spice and seasonings (and I add here, that often, sauteed onions and garlic add a lot in terms of spice and flavor!!!)
2.) Tomato or broth base (in both cases I add Better Than Bouillon No Chicken Base)
3.) Beans
4.) Steamed vegetables
5.) Quick cooking whole grain

The variations of this theme are endless.
Here are five of them I found on his site. I am saving up to buy his two DVD's on Vegan Fast Food. But for now I am happy with understanding The Method.

My meals feel so complete when I eat this way, and my body feels very satisfied.

I have made Dish 1 and Dish 3. It was so fast and easy, and delicious (I do add salt and "no chicken base" to the broth) and throw in some of my own flair. The food was done so quickly that I felt like I had a night off when I followed this method.

Admittedly, I can't stand the thought of "zapping" any of my vegetables. I have an electric pressure cooker and just throw in my potatoes with my veggies and have them cook together. Then use the broth or tomato base, plus salt and seasonings, beans and grains. YUMMY!

Dish 1 - Curried Indian Potato Stew

1) 2 cans whole tomatoes
2) 1-2 cans Garbanzo Beans
3) Frozen Cauliflower (1 1/2 - 2 lb) , peas (1/2 lb), onions (1/2 pound)
4) 3 large potatoes
5) Salt Free Curry spice mix

Microwave the potatoes. While they are zapping, put all other ingredients in the pot and heat. When potatoes are done, cut into 1 inch pieces and add to pot. Simmer 5 minutes. Top with fresh cilantro Enjoy.

(can be served with brown rice which you can cook in 10 minutes while potatoes are cooking by using Success Brand Quick Cooking Brown Rice)


Dish 2- Mexican Beans and Rice

1) 2 cans whole tomatoes (or 1 can whole, 1 can pureed)
2) 1 cans Pinto Beans, 1 can black beans
3) Birdseye Frozen Pepper and Onion Mix (3 lb), and Corn (1 lb)
4) Success Quick Cooking Brown Rice ( 1 large bag)
5) Mexican Spice Mix, or Hot Sauce

Cook Brown rice. While brown rice is cooking, add all other ingredients to the pot and heat. When rice is done place rice in a bowl. Top with beans, veggie and tomato mix. Top with fresh cilantro Enjoy


Dish 3 - Italian Pasta Primavera

1) 1 Can whole tomatoes, 1 can tomato puree
2) 2 cans Dark Red Kidney Beans
3) Frozen Broccoli, Cauliflower, Carrots (3 lbs total)
4) Whole Grain Pasta (1 lb)
5) Italian Spice Mix

Cook Pasta. While pasta is cooking, put all other ingredients into large pot and heat. When pasta is done, rinse, and them mix together with the tomato vegetable mix. Top with fresh parsley or basil. Enjoy!


Dish 4 - Longevity Soup

1) 1 can whole tomatoes, 1 can pureed
2) Your favorite beans (I use kidney or garbanzo)
3) 2- 3 lbs of Your favorite frozen veggies plus 1 lb of frozen collards
4) Your favorite starch (potato, sweet potato rice, barley) cooked separate then added
5) your favorite seasoning (I use fresh ginger, garlic)

Place tomatoes in large pot. Add in 2 28 oz cans of water. Then add in all other ingredients. Bring to a boil and then simmer 15 minutes. Enjoy!


Dish 5 - New Orleans Jambalaya

1) 2 28 oz can Whole Tomatoes (No Salt Added)
2) 2 cans 14 oz can red beans or kidney beans (No Salt Added)
3) 3 lbs frozen Vegetables, corn, carrots, zucchini, yellow squash (equal parts)
4) Success Quick Cooking Brown rice (1 large bag)
5) Spice mix

Cook Brown Rice (Success Quick Cooking), While rice is cooking, place tomatoes, and veggies in pot and heat. Add in 4 cloves garlic, diced, 1 bay leaf, 1/2 tsp thyme, 4 tsp paprika, .25 to .5 tsp cayenne pepper. And heat.

When rice is done, place in a bowl and serve tomato vegetable mix on top.


This gives me an idea...would you enjoy a series on Vegan Fast Food? I could post recipes that take 30 minutes or less that your family would enjoy, and even give tips on how to make it faster.

Tuesday, August 14, 2012

Purple Power Smoothie


A few days ago I found myself so hungry I realized I should have eaten 20 minutes ago!

Has this ever happened to you?

Some words from my brother came to mind, "Ashlee, nothing you have to feed me will suffice! I am just too hungry."

At that moment I knew exactly what he meant by "too hungry."

When this happens I try to have a few healthy go-to snacks, or snack ideas on hand so that I don't panic. Nothing really sounds appetizing that's junk-foodish because junk food never has any satiation power.

I remembered that I had a new green purple smoothie that I could fix super-fast, and then I didn't feel so desperate. I tend to memorize smoothie recipes after fixing them one or two times so that I can make them in a flash.

After those one or two initial makings of it, I generally stop measuring, and just throw the basic ingredients together the way I like it. Which generally consists of adding a lot more greens than the original recipe calls for. I LOVE greens. I love them because of how they make me feel.

Paul and I were talking about how, after drinking a green smoothie made entirely from fresh produce, water, and ice, that we never feel sick. And, admittedly, some foods make me feel sick. You have experienced this before, too, I am sure!

It has taken me a while to really realize that smoothies are more than just a breakfast food. They are snack food, sometimes even dinner food. Basically, just a good ol' anytime standby food.

And it goes without saying that, fresh produce, in whatever form you eat it (whole, as a salad, smoothie, or whatever) is dairy free, gluten free, oil free, meat free, soy free, egg free; free of a lot of junk and stuff we don't want!

So grab produce when you are just too hungry, and you will feel great!

Here's one way to enjoy fresh fruits and veg. It's like a salad in a blender that doesn't require any dressing.

What is your favorite go-to food that makes you feel great when you find yourself too hungry?

Coming up I have found and improved a fantastic nut/soy/dairy-free cream sauce that has a secret ingredient! You'll never guess what it is!

And look here for my other favorite green smoothie.


I was intrigued by this recipe because of it's liquid foundation: pomegranate juice. It can be found at Costco, Target, and other natural food stores. It makes the berries pop, and the taste of greens completely disappears.

Purple Power Smoothie
From Dr. Joel Furhman's book, "Super Immunity."


Ingredients:
1 cup pomegranate juice (I had to use more juice, almost 2 cups, because I add more greens)
1 cup compacted spinach (I used 3 cups compacted, I didn't have Boston lettuce)
1 cup compacted Boston lettuce
1/4 of a medium cucumber
1/2 cup frozen blueberries
1 cup frozen mixed berries or strawberries (I added 1/2 cup extra and omitted blueberries)
3 pitted dates (blended dates hurt my stomach for some reason, so I added 3 packets of stevia plus 1-2 teaspoons of agave nectar)
2 tablespoons ground flax seeds
1 cup ice (don't skip, don't underestimate the power of ice to enhance smoothie flavors)
2 tsp green powder (my addition/modification, I use Ormus Supergreens)


Directions:

Blend ingredients in a Vitamix (I use my Blendtec) or other high-powered blender until smooth and creamy. If you don't have a high-powered blender I still encourage you to make this, but halve the recipe or work in batches and blend until smooth and creamy.

For PROJECT VEGAN KIDS (ALL MY KIDS LOVE IT) &
For GO DAIRY FREE SERIES

Thursday, May 3, 2012

Project Vegan Kids Fruit Sushi

I am reminded that Project Vegan Kids needs to continue. I am going to try to label all of my posts that are a part of Project Vegan Kids so that if you do a search in the google search bar, you will be able to find all the posts pertaining. Also, I am going to add a link to the side bar for Project Vegan Kids.

As a part of Project Vegan Kids, I need to refer you to an awesome vegan twist on raw sushi/the good ole regular PB&J.

These recipes can be found at aimeehenrikson.blogspot.com. Who is my Fabulous Flexitarian sister! She is a brilliant chef, food artist, and photographer. Let me give you an example:


How many of you Moms, or anyone looking for a snack, get a little tired of the PB&J? ME! Pick me! And, how many of you have to pack lunches every day that are eaten by the world's greatest skeptics? (That would be your child.) Me again. You too?

Here is some variety! And my kids LOVED these! I was skeptical, I will admit it.

It's GREEN for crying out loud.

Since when do most kids let you make them a lunch wrapped in green? BUT! My kids now ask for Aunt Aimee's special sushi DAILY.


Just a tip, make sure your leafy greens are organic. Organic romaine lettuce is to die for, and wraps much easier than regular, "hair-sprayed" (pesticide sprayed) lettuce. Foods your kids eat that are thin skinned should absolutely be organic.


This is another variation of raw vegan fruit sushi. Uber kid friendly. Total blessings from heaven, is what they actually are. And I am not just saying this because she is my sister. These have been kid-tested, remember, and kids always tell you like it is.

Your kids will love it, they will love you, and you WILL do a happy dance in your kitchen! Every single ingredient is good for them. It's different. It's fun.

And may I recommend adding her blog to your blog list? She is continuing to invent new recipes for vegan children such as sugar free vegan muddy buddies and more variations on fruit sushi/vegan lunches.

So hop on over to Fabulous Flexitarian's delicious universe, and get some variety on that PB&J!

P.S. Dr. Joel Furhman says that children's diets should largely consist of fruit, vegetables, and raw nuts and seeds. As I was going about my day today, I realized that these little sushi's are just that. A perfect compliment of vegetables, fruit, nuts, and seeds. Wrapped up all in one pretty little edible package. When I feed these to my kids, I feel like it is nutrition perfection. Whole foods at its best. Need I say more?

Friday, January 27, 2012

Sour Mango + Spinach Smoothie


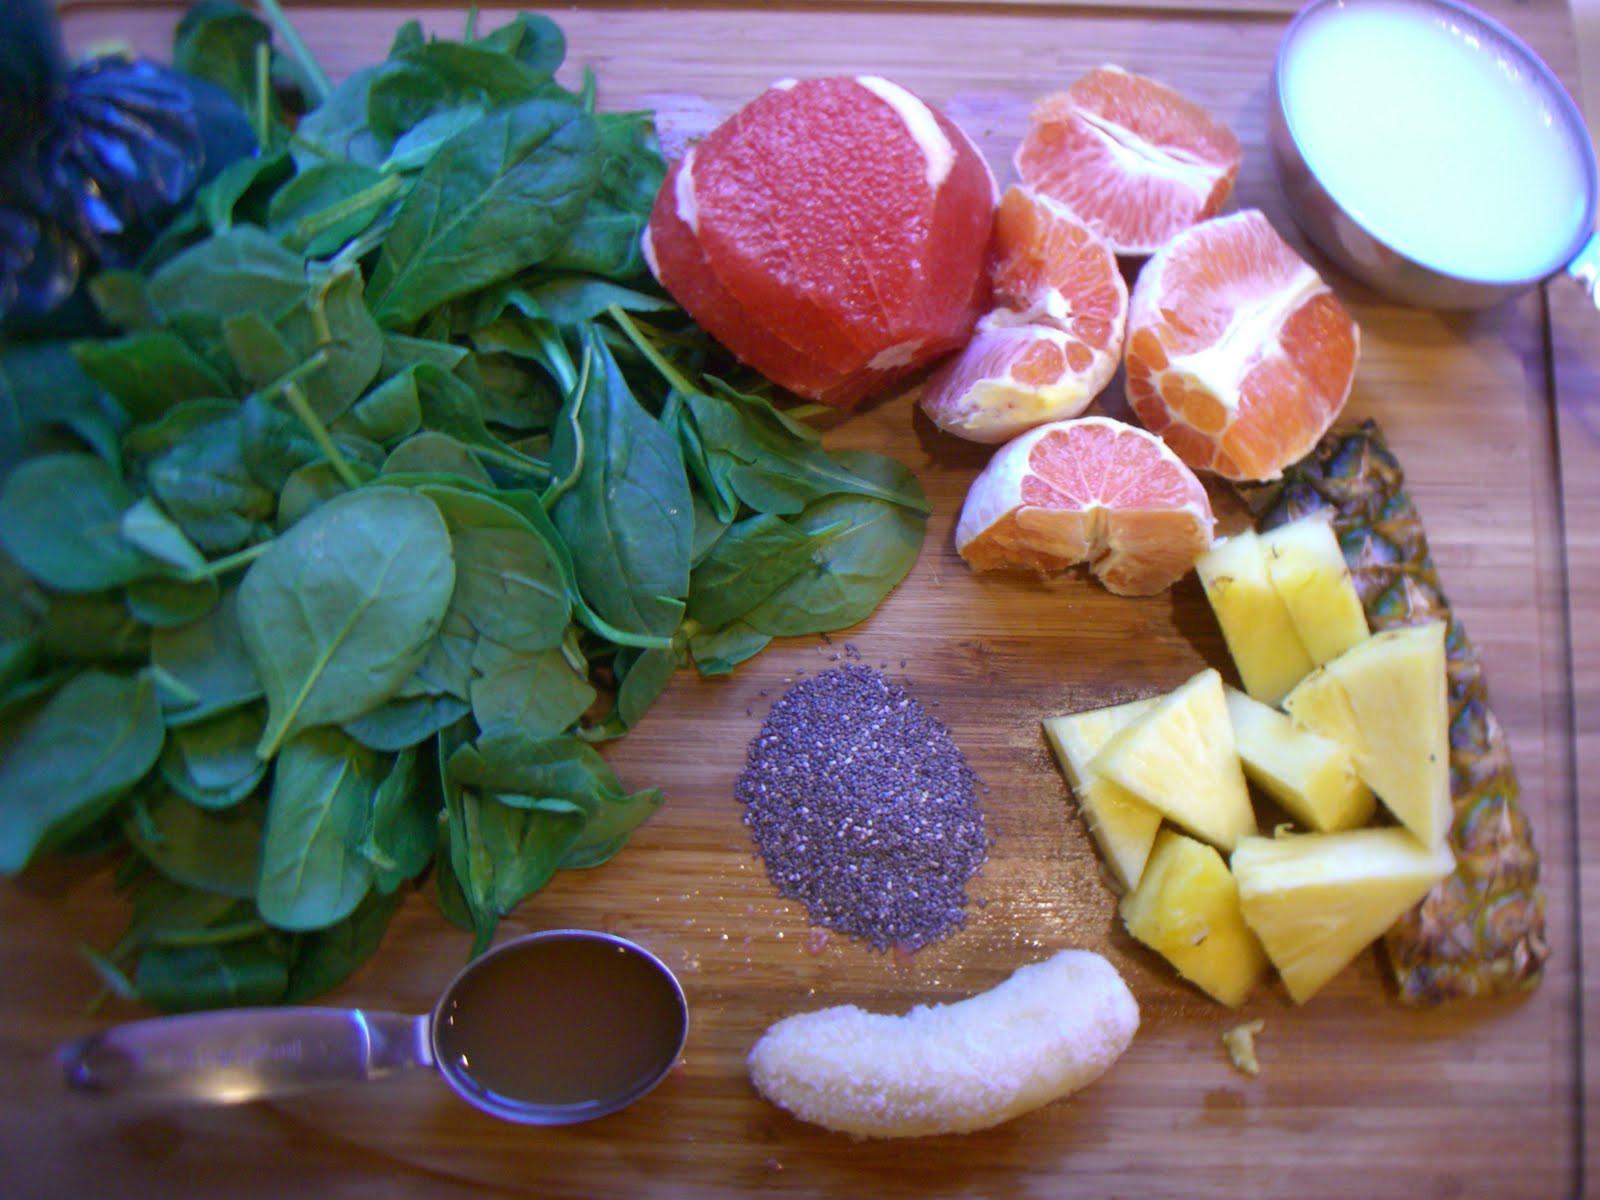
See what I mean by 75% greens and 25% fruit? This is where I see you in 6 months. Or maybe you are already here. Awesome.

This beautiful combination of fruits and veggies was invented by Aimee Henrikson. My culinary genius of a sister. It is actually the inspiration for the name of this blog.


Aimee made this for us while we were visiting in Utah on a Saturday. It made me feel SO GOOD that the next day as we were sitting in church I couldn't stop thinking about it. I felt like a kid whose mother had made cinnamon rolls and I couldn't wait to go home and eat them!

While I was trying to pay attention to the speakers it must have looked like I was sitting on a hot stove. Counting down the minutes until I could jump up, run down the street back to my Mom's house, and make that smoothie as fast as I could. It was during this very child-like moment that the name hit me.

This smoothie was like a literal plant infusion. It made me feel like the plant ingredients plus the apple cider vinegar were scrubbing out all of the yucky toxins and fatigue right out of my body.

In anticipation I started chanting quietly, "Plant Infusion! Plant Infusion!"

And thus the name of this blog was born.

Thank you, Aimee. I bet you didn't know that your creations are THAT inspirational. What'd I say? Genius, I believe is the word.

This is often my breakfast and lunch.

This green smoothie is very portable in a glass quart jar.

Warning: glass quart jars are clear. If you walk around drinking this in public people will ask you questions.

I think I'll go make this right now.

P.S. Keep the pineapple core on your pineapple and include it in your smoothie. I was walking past Mr. Blendtec salesman dude at Costco the other day (why does the idea of buying my blender all over again excite and intrigue me?!?!?) and he said, "Leave the core on the pineapple as that is where most of the vital nutrients are contained. The blender will make it smooth as ever."


Sour Mango + Spinach Green Smoothie (or Green Drink)
Adapted By Aimee Henrikson (my sister!) from Diana Stobo

1 cup vanilla or plain kefir, coconut kefir, soy yogurt or plant milk
1 cup water
1 grapefruit, bitter skins and piths removed (see citrus avocado salad on how to fancy-peel citrus)
2 peeled oranges
2 cups fresh spinach (or more if you are aiming to incorporate more greens)
1-3 TBSP apple cider vinegar (according to how sour you like it, I love 1/4 cup!)
1 heaping tablespoon green powder (optional, I use Ormus Supergreens which really adds flavor)
1 cup mango or 1 cup peaches, depending on your preference (fresh or frozen)
1/8 – ¼ of a fresh pineapple depending on your desire for sweetness
2-3 Tbsp Chia seeds or flax seeds (to get your omegas and fiber, and attain a feeling of fullness)
1/2 frozen banana (optional, for added creaminess and sweetness)
½ to 1 cup ice

Layer in blender the liquids, then soft foods, then frozen foods. Blend well. Can add ice and the water if you want it colder and less thick.

I put this in my WildSide larger blendtec blender and I have to smash it down to make it fit. The blender has to really work to get it fully blended so if you do not have a WildSide Blendtec, halve the recipe.