Showing posts with label side dish. Show all posts

Friday, January 25, 2013

Pizza Foccacia and The Story of How My Fridge Died


My dear friends. I have wanted to write all week.

Rewind to Monday.

I peeked in the fridge, as we are all apt to do, and found that everything in my freezer was melting. Ice was turning into water, my frozen bananas were no longer white and pretty, but brown and mushy. Something was not right.

The temperature in the fridge was 50 degrees F (supposed to be 38 F) and the temp in the freezer was 38 degrees F (supposed to be 0 degrees F). Everything was much too hot, hot, hot.

Seeing the abnormal temperature, I called our repair-woman to have a look at it, thinking that simply the refrigerator needed to be reset. After an hour or so of working with, taking apart, hot-wiring, and looking at my fridge, the diagnosis was in.

My fridge was dead.

I was shocked. I did not expect a five year old fridge to die. My parents' fridges have all lasted what seemed like 20 years!


My beautiful, $1,800 dream fridge that Paul saved and saved to buy me as a gift five years ago when we first moved into this house. He had been saving that money for other important things...like our future, or our children's future... Instead, he plopped down a lot of money to get me new appliances.

He saw me struggle. No dishwasher. The worst stove on the planet that was 20 years old and had only two settings: simmer, and scorch. A broken trash compactor, and a 20 year old, tiny fridge.

It didn't really sink in at first. Until Paul and I went fridge shopping and saw that the same type of fridge now cost $2,400, plus tax and delivery. Ouch.

Major ouch.

We went home feeling sick. Woke up feeling even worse. How can we possibly feel good about spending that much money on a fridge? Paul pointed out that the amount is the same as the cost of a car! When we bought the fridge in the first place, we thought we would have it for a very long time and therefore had justified the purchase.

And it didn't help that we were now having to throw everything in the fridge away.

It felt like we were camping in our house. Only worse.

My kitchen became dysfunctional.


Fridge food all over the counters, fridge parts strewn everywhere.

It doesn't seem like something as simple as not having a fridge would bring life to a screeching halt. But when you are eating mostly plants? When you thrive on a lot of raw food, and cooked veg?

I boxed up all of our food.


Something I am really grateful for is the cold. Outside. Right now. I am so glad that it is winter time and that our great outdoors can act as a pseudo-fridge until we can figure out what to do.

Paul put it outside.


We went fridge shopping again yesterday and came home hungry and tired. It's been well over a week since I have done any grocery shopping, and so our options seamed meager under the circumstances.

I needed something easy.

At first, I was convinced I would make my easy Calzones that my kids love. Despite how easy the filling is to make (as fast as a green smoothie in the blender) I couldn't bring myself to do it. Not to mention I couldn't find all the ingredients in my messy kitchen.

And so I dreamed. Of something even easier.

Pizza Focaccia.

My bread machine did all the work. I broke all the rules. And used Extra Virgin Olive Oil.

This is the kind of recipe you make if your kitchen is all torn apart.


The kind of recipe you prepare when you can't think straight, and you really don't want to hear any complaints from your kids about food.


The kind of food you eat when you are low on produce and you just need some comfort.


The rosemary, basil, and olive oil took me to The Olive Garden.

Right where I needed to be.


Pizza Focaccia (with a Gluten Free option)
Inspired by, and Adapted from, Eat, Drink and Be Vegan

Makes 4-5 servings as a side bread for a meal.

Note from Dreena: Fresh rosemary really gives this pizza a wonderful taste and aroma. If fresh rosemary is not available, you can substitute with 3/4-1 tsp dried rosemary, coarsely chopped, or crushed between your fingers.

Note from Ashlee: Many fellow moms have mentioned to me that when going plant-based, pizza becomes difficult for kids. I really recommend this easy, tasty option.

You can make whole grain, homemade pizza dough, or purchase it pre-made from the store to make this meal even easier. I was able to serve this with marinara for dipping, (which I did not use with my bread because I savored the taste without it!) with a large salad, oil free dressing, and a lot of cut fruit and pomegranate juice for my kids. They loved the bread. Toppings can easily be tailored to whatever you or your children prefer to eat. Chopped bell peppers, fresh pineapple chunks, black beans, green chile, olives, red onion, spinach, basil, etc.

Just make sure you add the rosemary, basil, salt, pepper and olive oil because that is where the flavor really pops. Be careful not to overload the bread with too much veg, or it will become soggy and the rosemary will taste less pronounced. I recommend you keep it simple the first time around you make it, and really focus on the fresh herbs and seasonings.

TO MAKE THIS GF: Bob's Red Mill brand carries a gluten free pizza crust flour mix that is easy to make by following the directions. Also, I have seen pre-made Gluten Free pizza dough in the freezer section at Whole Foods Market and Sprouts.


Ingredients:

1 whole wheat pizza dough (I used the dough recipe from my Calzones, see below)
1 tablespoon extra virgin olive oil
1 1/4 to 1 1/2 teaspoons fresh rosemary (or use 3/4 to 1 tsp. dried rosemary, coarsely chopped)
1/3-1/4 teaspoon sea salt, to taste (I used 1/3 tsp)
Freshly ground black pepper to taste (I used fresh ground Rainbow Peppercorns)
1/2-1 tablespoon extra virgin olive oil
1/4 cup fresh basil, julienned, or chopped
Optional additional toppings we enjoyed:
Black olives, chopped, about 1/3 cup
Red onions, chopped, about 1/3 cup

Chopped green chile, or roasted red pepper flakes sprinkled on top could really add some heat if that's what you like! I have not yet tried the green chile, and it may compete with rosemary too much for flavor, or be soggy. But it is an idea. See my note above for other topping ideas.

Directions:

Preheat oven to 425 F (220 C). Line a baking sheet with parchment paper. Using a pastry brush, spread 1 tbsp oil over top of shell, then sprinkle on rosemary, salt, and pepper, and lightly sprinkle with any additional toppings of your choice. Bake for 9-13 minutes (mine baked in about 13 minutes), until edges are golden. (If using a frozen pizza shell, you will need to bake for another 3-5 minutes.) Remove from oven and drizzle 1/2-1 tbsp oil over the hot bread, then sprinkle on basil. Cut into slices or wedges.

Serve with a large salad and fresh cut fruit. I also made additional toppings available for my son who loves olives.


Pizza Dough for Bread Makers
(makes 2 lb size)

Ingredients:

1 1/2 cups warm water
2 TBSP olive oil
2 tsp. salt
1 and 3/4 cups unbleached, all purpose flour
2 cups white whole wheat flour, or sprouted whole wheat flour (found mine at Whole Foods Market)
3 tsp. sugar
1 tablespoon gluten flour (optional, helps the dough to rise and be fluffier)
2 tsp. yeast

Combine all ingredients in your bread-maker, in the order listed. Set the bread-maker to the "Pizza Dough" setting (about 55 minutes) and push start.


**********

Robyn Openshaw of Green Smoothie Girl mentions in her healthy book that Foccacia served with a large salad is one of her and her children's favorite meals to have for dinner. Somehow this makes me feel a whole lot more confident in serving this meal.

Other foods we've been enjoying that are easy in this time of chaos:

Rice Pudding
Bok Choy Saute (yes, again!)
Light and Tender Waffles (none of the ingredients need refrigerated!)
Seasoned Quinoa, a modified version that I need to update

Tuesday, October 16, 2012

Pumpkin Pie Smoothie


How much change is undergone before you can call a recipe your own creation?

My sister and I had a phone conversation about this last night. She is an artist. In art world, a piece of work can be called yours if it has undergone a 30% change, or more.

How do you measure that in food?

When I first tried this pumpkin pie smoothie, I really, really wanted it to work out. There's all this talk about pumpkin pie smoothies.

Well, I don't want to be left out.

I want a yummy piece of pumpkin pie in my smoothie, too. You can say that in a whiny voice, and I will fully support it.

You won't believe my line of thinking. Please don't laugh. Okay, laugh if you want to, as long as I can't hear you. My line of thinking went something like this: How can I make this a green smoothie? I really don't like drinking smoothies without a vegetable in it. Yes, it took me a few minutes to recall that pumpkin, after all, is a vegetable. Genius. Are you sure you want to eat my food after hearing this very sad tale about moi?

All right. Brought myself to attempt said recipe.

Paul is a green smoothie drinkin' monster. Most any green smoothie I give him, even if it's not-so-good, he will drink it. This tall glass of pumpkin-ness, however, sat. Half consumed. I could see him glance at it every once in a while, intermittently throughout his meal. Trying to determine what he thought of it, and figure out a way he could get the rest of this health food concoction into his body. Without having to taste it.

And I stood there, staring at him, staring at his smoothie. Willing him to like it.

Please, please like it.

Realized I could taste my own tall glass of pumpkin-ness to see if it was good or not. I have taste buds, too. Wow. So thick that it is hard to swallow; gives me the sensation that I really should be chewing it.

First taste pumpkin. Then banana. As an aftertaste, spices that make my throat burn. Every time I swallow. These flavors take turns dancing on my tongue.

There is no way. No way I can post something like that on my blog. Or even make reference to it, or add a link to it, if I myself am having difficulties choking it down or having to remind myself it is healthy, and therefore I need to finish it.

I was torn. This recipe had serious potential. I could tell it was a work of art in the making, and I did not want to kick it. I wanted, very badly, to keep it.

Then, I remembered. Oh, yeah. I modify recipes. It's what I do.

Went back to the drawing board, and made my little modifications.


Paul and I went from trying to choke down the smoothie, to trying to figure out how we could scrape every last bit of pie goodness out of the blender. Off of the blender lid. Out of our green smoothie jars.

I might have even licked the rubber spatula.

First taste...pumpkin pie. That's it. And then I want more.


Pumpkin Pie Smoothie
Adapted from Angela Liddon

~2 servings

Note from Ashlee: The changes I made are small, but they made a big difference. The smoothie went from too thick and overpowering, with choppy flavors, to sweet, nicely textured, well-combined flavors. I removed the dried ginger, reduced banana and molasses, incorporated more ice, and added stevia. It wasn't sweet enough without stevia. After making my modifications, and recording them carefully, I made this recipe three more times, with the same great success every time.

Portions of this recipe have to be prepared in advance. An oat/milk/chia seed mixture needs to thicken, and you will need a frozen banana.


Ingredients

2 cups almond milk
1/2 cup rolled oats
2 tbsp chia seeds
1 cup canned pumpkin
1 tsp blackstrap molasses
3/4-1 frozen ripe banana (less is better than more, otherwise it will just taste like banana)
2 tsp cinnamon
1/4 tsp ground nutmeg
15-22 ice cubes (creates better texture, and makes it cold which enhances flavor)
2 tbsp pure maple syrup
3-4 packets of Stevia (don't skip! This makes the smoothie sweet without adding sugar!)
Coconut Whipped Cream, for garnish


Instructions

1. In a medium-sized bowl whisk together the milk, oats, and chia seeds. Place in fridge for 1 hour or preferably overnight.

2. Add soaked oat mixture to blender along with the pumpkin, molasses, frozen banana, stevia, spices, ice and maple syrup. In other words, just throw everything in your blender all at once.

3. Blend until smooth. Add additional ice cubes to achieve a smoothie-like texture. It should not be so thick that it looks/feels like pudding. Blend until ice cold. (If you don't have a high powered blender, you may need to layer your ice in the blender first. Or use less ice. I would start out with 8-12 cubes, blend, and then add more from there. The additional ice is what changed the texture and made it drinkable, instead of being so thick. I would hesitate to reduce the ice cubes.) It takes three full cycles on my powerful blendtec to get this smoothie completely smooth -- there should be no grittiness. So blend the tarnation out of it.


4. Serve with Coconut Whipped Cream and a sprinkle of cinnamon on top! (I don't do this because I am too lazy, and find that the smoothie is great without it.)


Some things you should know about this recipe:

It's one of those "you have to prepare the night before" things. Or at least let it sit for an hour or so.

I know.

I am not an overnight prep girl, myself. I don't do overnight lasagna, overnight breakfast casseroles. Any of that stuff. And I have to tell you that I was frustrated.

I wanted my smoothie. NOW.

But I went ahead and made the prep ingredients, and then put it in the fridge. Later the same day, I made my smoothie. Right after finishing it, I made another batch of prep ingredients for overnight.


Now, it's a habit. I make the prep part right after blending the previous nights' concoction. Ready for tomorrow!

And.

It requires frozen bananas. I would not use a banana that has not been frozen.

Here is what I do. After being addicted to banana ice cream all summer, and then needing bananas for my favorite muffin recipe, I learned to buy a lot of bananas.

Every week when I go to Costco, I buy 4-6 bunches of bananas. At $1.29 per bunch, this amounts to about $6-$8 a week. Totally affordable. The kids and I eat through as many as we can over the course of the week, while the rest sit on the counter to sweeten.


When they are speckled brown, I grab my kids and we have a banana party. They coin bananas and put them in freezer Ziploc baggies, while I clean the kitchen.


Sometimes we eat the bananas. I have no complaints. Dr. Atkins, if alive, probably would, though.

They store very well, lying flat in my freezer, inside freezer-Ziploc gallon bags, available for banana ice cream.

Also available for a great Pumpkin Pie smoothie. I can't remember the last time we threw away an old banana in the trash. They are too precious around here.

Lastly, oats and pumpkin are some of the highest fiber foods. Sorry, Metamucil. I'll put you out of business.

Happy Autumn!!


Thursday, October 11, 2012

Fried Tofu // Incorporating Soy in Your Child's Life


Transitioning to a plant-based diet was very difficult for my kids. At first. Especially for my oldest, Essie.

Another one of the unforeseen negative side affects of trying low carb, was that I had trained her palate to enjoy meat, cheese, heavy cream, eggs, and salmon in particular.

It was hard for her. She struggled. In one week I had completely changed her menu. No eggs for breakfast, meat and cheese for lunch, and hot dogs for an afternoon snack. No salmon for dinner.

Looking back on that I shake my head. Literally. What a SAD menu. Where were the whole grains? The fruit, vegetables, raw nuts, beans? No where to be found.

What a tragedy.

But unlike dramatic plays, this tragedy has a happy ending. Or beginning. Depending on which way you look at it.

It's called tofu. Soy. If prepared and presented the right way, kids love. Of course, I try with every meal to incorporate as many nutrient-dense foods as possible for my children, but soy foods really help them get the calories they need. I do not use soy as a replacement for other nutrient dense foods, but rather, in addition to them -- as a side.

The first time Essie tried crispy tofu, I saw the gears turning in her head. Excitement. And I could see that she decided that this eating veg thing wasn't so crazy after all. She could do it. Enjoy it.

So, I thought I would write about some of our favorite soy foods. (See my and Dr. Joel Fuhrman's opinion on whole soy foods, here.)

Starting with the basics. Soy milk. My children's favorite non-dairy milk, it is creamy, a little bit fatty, higher in calories than almond milk, and delicious.


Organic, unsweetened, enriched with calcium, vitamins A and D, and a good source of Vitamin B12. (All vegans need supplementation with vitamin B12.) They love it poured all over their breakfast oatmeal, cereal, or Mighty Tasty Hot Cereal. They also drink it straight out of a cup, with their meals, or use it for dunking cookies.

Next would have to be soy yogurt. I'm tellin' ya we are all addicted to this stuff. I have tried other yogurts -- almond, coconut, etc, and they cannot compete with the flavor or texture.


I hope you get a chance to go to Trader Joe's and try soy yogurt like this. For $2.49 per large container, it's affordable and every week I buy about 4-5 of these. Seriously. Addicted. It contains live probiotic cultures; helpful for the digestive system. This yogurt sells fast at TJ's so go during the week, especially in the morning to make sure you get some. Just a little trick I learned. It's always gone on a Saturday evening.

If you don't have a Trader Joe's, Whole Foods Market also carries Silk Soy Live! yogurt, large container for about the same price. I don't find it to be as tasty as TJ's yogurt, but remember that you can always add some sugar or other flavorings (maybe some fruit jam?) to yogurt to make it tastier.

We eat it as a snack, and I also use it to replace oil in my baked goods (use half the amount than oil). Because it contains fat, and is quite thick, I think it tastes much better as an oil replacement than applesauce does. Kids need fat. I am convinced. They want it, crave it, love it.

Essie had first tried crispy tofu at a restaurant. They deep fry it. Wow. Is this stuff good! I am working on going to a Thai Diner and asking to buy their deep fried tofu (sounds terrible, I know, but kids need fat) directly from them. No way am I buying a deep fryer.

Until then (I'll let you know how that turns out) I love using pre-baked, organic, seasoned tofu. Trader Joe's sells three different flavors; BBQ, Savory, and Teriyaki. I am sure other health food stores carry similar products. I just haven't looked because we are happy with TJ's.


What I do: open a package of pre-baked, seasoned tofu, and slice them into cubes or bite-size slabs. I try to maximize the surface area so that it can get toasted well and become pretty crispy. Get a nonstick skillet, and pre-heat to medium-high heat. Throw cubes in the skillet without any oil, and brown on both sides. Makes it crispy and warm. Serve with ketchup, BBQ sauce, ranch dressing, or their favorite sauce. My kids love this, and clamor over who gets the last piece.


For Sandwiches: Take a block of pre-baked, seasoned tofu, and either chop it fine with a knife or pulse it in the food processor until fine. Immediately press it into hummus that has been spread over some whole grain bread. The tofu loses moistness if you wait too long, and doesn't stick in the hummus as well. Spread a second slice of bread with hummus, and put the two pieces together to form a sandwich. I try to press/compact as much tofu in the sandwich as possible.

I also love using the Teriyaki tofu in our VERY favorite Thai Noodle dish.

Kids love ice cream, creamy treats. I mostly make banana ice cream for them in my food processor, but I also buy soy ice cream, and soy ice cream novelties.


One of their favorite treats is chocolate milk. Pictured is the almond chocolate milk because it was in my fridge, but soy chocolate milk is also commonly sold (even at Wal-Mart!) and is very delicious!


Not every child enjoys meatless hot dogs. I don't think they taste fantastic. But for some reason, my kids really like them. It helps to have them on hand for immediate snacks. Just follow the directions on the back of the package for the best results in preparation.


Tofurky, a sliced deli meat, is also available (pictured at the very top). I do think that this stuff actually tastes good. Pair it with mayo or some hummus your kids like, and you have a sandwich. Or, if you are like Samuel, you munch on it plain. Samuel and Megan love it. It is a more refined food, so I do avoid serving it to them, and strongly prefer to serve them organic tofu.

Sprouted organic tofu. Or sprouted organic tempeh (another tofu product). Fried my way. The Dreena Burton way. Yummy!


What I do: Remove tofu from package, and carefully pat/press dry with paper towels. Cut into cubes, and marinate for 20 minutes. Toss in corn starch. Fry in 3 tablespoons of oil on high heat. Serve with ketchup.


PROJECT VEGAN KIDS
VEGAN FAST FOOD!
(If you marinate the tofu/tempeh for 15 minutes or less.)


Pan-Fried Tempt-eh! Or Tofu!
By Dreena Burton, from "Eat, Drink, & Be Vegan."

Makes 5-6 servings as a side dish or nibbler, or 3-4 servings as an entree.
Wheat Free
Gluten Free if you use tofu and corn starch

Note from Ashlee: Although this recipe is for tempeh, my children find both tofu and tempeh very appetizing. I have tried baking my tofu with seasonings and my kids and I do not enjoy it. They like it crispy (because there is so much oil, I try not to eat this!). These are a great replacement for the chicken nugget, when served with ketchup or other dipping sauce. See Dreena's note below, for tips on using tofu in this recipe.

Ingredients:

1 1/2 tablespoons rice vinegar or apple cider vinegar (for tofu, use balsamic or red wine vinegar!)
1 1/2 tablespoons tamari (soy sauce)
1 package (8-oz/227-g) tempeh, or 1/2 package (15-oz) extra-firm tofu, patted/pressed dry with paper towels.
3-4 tablespoons cornstarch (or arrowroot, but I found arrowroot to be gummy when fried)
3 tablespoon coconut or olive oil
lemon wedges, for serving (optional, I never add this part)

Directions:

In a large, shallow dish, mix vinegar and tamari. On a cutting board, cut tempeh about 1/2 x 3 1/2-in (1x9-cm) slices. Add tempeh to vinegar-tamari mixture to marinate, turning slices to absorb marinade on both sides. If possible, allow tempeh to marinate for 20 minutes or more in the refrigerator.

In a large dish, spread cornstarch (or arrowroot powder). Dip each tempeh slice in cornstarch, gently tapping to remove any clumps (some areas will have a thicker layer of cornstarch, this is okay.) In a small to medium size non-stick frying pan on high, heat oil. Add tempeh slices and fry on one side for 4-6 minutes until golden brown and crispy. Flip over and cook for 4-5 minutes until crispy, adding more oil if needed. Flip again if needed. Remove and serve immediately with a squeeze of lemon wedge (for adults) or with a favorite dipping sauce...be sure to eat them while still hot.

Note from Dreena: You can substitute tempeh with tofu (I DO!) in this recipe: use 1 pkg (12-oz/350-g) fresh extra-firm tofu, cut into 1/4-1/2 inch thick squares and press between paper towels to remove excess moisture, then marinate it as you would the tempeh (using 2 tbsp Tamari).

This is so good, even my normally "tempeh averse" husband loves it. I originally created the recipe using tofu, which is an excellent variation. Either way, this Tempt-eh! is a little crispy, a little tender, and a whole lot delicious. This appetizer can also be served in an entree with noodles or a whole grain.

Monday, September 17, 2012

Panda Express Copycat // Rice Crispy Treats

Parents should make it their first business to understand the laws of life and health, that nothing should be done by them in the preparation of food, or through any other habits, which will develop wrong tendencies in their children. How carefully should mothers study to prepare their tables with the most simple, healthful food, that the digestive organs may not be weakened, the nervous forces unbalanced, and the instruction which they should give their children counteracted, by the food placed before them. This food either weakens, or strengthens the organs of the stomach, and has much to do in controlling the physical and moral health of the children, who are God's blood-bought property. (Seven Secrets Cookbook, by Neva Brackett, pg. 45)

I have had guilt issues with working in my kitchen. I know. It sounds ridiculous. I have even had to talk to Paul about it, in depth, and ask him if he thought that I was out of balance. He calmly asked me, "How else would you feed your family?"

Simple. I would go out and buy pre-packaged foods, eat at restaurants at least once a day, and almost completely avoid kitchen work.

We made these rice crispies over the weekend. Originally a home-made concoction, the food industry has made it into a pre-packaged food. They pump it full of chemicals and refined grains and sugars that were never meant for our ingestion. It also contains animal products.

I don't think that's what God gave me time for. I also don't think that it is just by chance that I have been able to learn so much about health and nutrition. Sometimes I feel like the knowledge He gives me about how to properly care for my family pours in so quickly that I had better act fast. Otherwise I will forget how to implement what He has taught me in my home.

I have pondered a lot about whether or not I should share my belief in God on this blog. After some time, I have decided that it is such a deep part of who I am, that it is inseparable -- my joy for living, and my belief in God.

I've finally concluded that I don't want my family to have to leave my home in order to get the nourishment that they need. There are already too many reasons that my children are called to be elsewhere, away from the safety of home. Trying to get sustenance, because there is none at home, should not be one of them. Home should be a haven. It should be a place where my children know, no matter where they are, if they are hungry, tired, and worn out from the world, that they can come home. At home there will be food, GOOD food, clean places to play, and cozy, warm places to sleep.

Here is a satisfying meal of "orange chicken" we made yesterday that is usually picked up from a fast food restaurant. They use animal products that have been pumped with antibiotics and chemicals, probably use MSG, and lots of refined oils and sugars and who knows what else.

I have watched how eating at home blesses my children. I have been able to see measurable results in all of their lives. Megan, especially, whom I have discovered, has a severe allergy to milk. Which, if consumed, triggers sinus congestion within hours and ultimately causes severe and chronic ear infections. If I didn't provide dairy free alternatives at home, she would be limited in the foods she could enjoy throughout her life.

My children at the breakfast table with a new bench we bought for them. Now we can fit over 7 people at our table! We also have a nook which fits an additional 4 people. Enough room for family and friends to enjoy wholesome, home-made food together.

Is the time I spend in the kitchen, worth it? Absolutely.

And it's not just my family that has been blessed by this kitchen work. Members of my extended family, good friends, and many others, have at one point needed help with finding foods that were more healthful. Each individual has their own story; their own particular needs for their family.

At times, I have been a bit shocked. Amazed at how much helping others find delicious recipes that aid in fueling superior health has blessed my life.

My Mac N' Cheese was spurred on by Carly, whose children didn't like the original recipe found in Seven Secrets Cookbook. We went back to the drawing board, worked with combinations, and created a better recipe. Cauliflower Bechamel was found and improved because of my sister, Catherine, whose family allergies prevented them from being able to consume dairy, soy, and nuts. And thus an allergen-free cream sauce was born.

Sometimes I am so elated about the health benefits of whole foods, and good recipes made from them, that I don't know what to do with that passion. That passion largely comes because I can see that God has provided all the materials necessary to enjoy a bountiful, whole foods lifestyle. He cares about what I eat, and has provided a way to make it enjoyable.

I believe that God cares about what I eat. I love being in nature because I cannot help but feel God's presence. He is in the tall trees, the cool air, and in every living thing around me.

This blog has helped me to channel that passion. Being able to share what I work so hard to find in my kitchen is like therapy. Instead of food preparation being a lonely, one man show, it's now a friendship. Having you interact with me about these foods, health principles, and concerns about nutrition in general has been wonderful.

While I dipped cauliflower in the "popcorn" coating, there was a lot of moaning and comments from my children, "Ew! What is that?" But by the end of the meal there were multiple return trips to the stovetop and, "Mom, is there any more orange chicken (cauliflower) left?" Nope. There were no leftovers of this large meal.

Now THIS is an easy meal I would serve to guests!


Copycat Panda Express Orange Sauce
From CCK

We served this over seasoned quinoa and steamed snow peas, with a side of orange slices. Start by making the Cauliflower "popcorn" nuggets, because they take the longest to bake. While they are baking you can prepare the orange sauce and steam some rice or quinoa.

1/2 cup vegetable broth (120g)
2 tbsp cornstarch or arrowroot (30g)
3-4 tbsp orange marmalade (45-60g)
2 tbsp minced garlic (30g)
1/2 tsp powdered ginger
2 tbsp plus 2 tsp rice vinegar (45g)
2 stevia packets, or 2 tbsp sugar (Liquid sweetener will work if you’d prefer; just maybe use a bit more cornstarch for thickening.)
2 tbsp soy sauce (or gluten-free soy sauce) (30g)
1 tsp sesame oil
optional: green onions for garnish, crushed red chilis for a spicy variation

Directions:

Whisk broth and cornstarch or arrowroot until dissolved. Now turn on the heat to low-medium and add all other ingredients. Bring to a boil, stirring occasionally. Once it’s thickened, remove from heat. Makes 300g (about 1 1/4 cup). Serve over whatever you wish: rice, veggies, soba, tofu, etc. As noted above, here are the directions if you wish to make chicken-style cauliflower (it works with tofu as well): combine 1/2 cup any type of flour with 1/2 cup water, dip florets of one head cauliflower into this mixture, bake 20 minutes at 425F, then pour the sauce on top and bake another few minutes.


Cauliflower "Popcorn" Nuggets

Ingredients:

raw cauliflower
1/2 cup all purpose flour
1/2 cup water
parchment paper
roasting pan

Directions:

Preheat oven to 425 degrees.

Cut the cauliflower into bite-sized pieces, removing the majority of the stem/stalk. Place in a large bowl and set aside.

Combine flower with water, and mix with a fork or whisk until well combined. Pour over the cauliflower. Gently and carefully, toss the cauliflower with flour/water mixture until all the cauliflower has been coated. The flour coating should cover all of one large head of cauliflower. You only want the cauliflower thinly coated, not gobbed with flour/water.

Cover your roasting pan with parchment paper. Spread out cauliflower onto the parchment paper evenly, so they bake evenly.

Bake for 30-40 minutes. Pour the orange sauce on top and baking another 10-15 minutes.


We doubled the batch. It was gone in two days. We changed out the nut butters because we didn't have macadamia nut butter -- an idea we got from Janae.

Holiday Variation: I was just totally thinking that the caramel sauce would make AWESOME popcorn balls!

“Nicer” Krispie Squares
From Dreena Burton

This recipe mimics the flavors and textures of Rice Krispie Treats using more natural ingredients. These squares taste phenomenal, with the buttery richness of the macadamia nut butter and the sweetness of brown rice syrup.

Ingredients:

1⁄2 cup macadamia nut butter (I use “Nuts To You” brand)(If you don't have Macadamia nut butter you can use 1/4 cup cashew butter and 1/4 cup peanut butter, or 1/2 cup cashew butter)
1⁄2 cup brown rice syrup
3 tbsp unrefined sugar (can reduce or omit, to taste)
1⁄4 tsp sea salt
1⁄4 tsp agar powder
1 – 1 1⁄2 tsp pure vanilla extract
4 cups natural brown rice crisp cereal


Instructions:

Line an 8×8-in (20×20-cm) pan with parchment paper. In a large saucepan on low-medium heat, combine macadamia butter, syrup, sugar, salt, agar powder, and vanilla. Stir continually as mixture heats until agar powder is fully dissolved (reduce heat if mixture starts bubbling).

Remove from heat and stir in cereal, making sure to fully incorporate with nut butter mixture. Transfer mixture to pan and press in evenly (use an edge of parchment paper to press without sticking). Refrigerate to cool completely, then cut into squares. Makes 16 squares.

Friday, January 27, 2012

Sour Mango + Spinach Smoothie


See what I mean by 75% greens and 25% fruit? This is where I see you in 6 months. Or maybe you are already here. Awesome.

This beautiful combination of fruits and veggies was invented by Aimee Henrikson. My culinary genius of a sister. It is actually the inspiration for the name of this blog.


Aimee made this for us while we were visiting in Utah on a Saturday. It made me feel SO GOOD that the next day as we were sitting in church I couldn't stop thinking about it. I felt like a kid whose mother had made cinnamon rolls and I couldn't wait to go home and eat them!

While I was trying to pay attention to the speakers it must have looked like I was sitting on a hot stove. Counting down the minutes until I could jump up, run down the street back to my Mom's house, and make that smoothie as fast as I could. It was during this very child-like moment that the name hit me.

This smoothie was like a literal plant infusion. It made me feel like the plant ingredients plus the apple cider vinegar were scrubbing out all of the yucky toxins and fatigue right out of my body.

In anticipation I started chanting quietly, "Plant Infusion! Plant Infusion!"

And thus the name of this blog was born.

Thank you, Aimee. I bet you didn't know that your creations are THAT inspirational. What'd I say? Genius, I believe is the word.

This is often my breakfast and lunch.

This green smoothie is very portable in a glass quart jar.

Warning: glass quart jars are clear. If you walk around drinking this in public people will ask you questions.

I think I'll go make this right now.

P.S. Keep the pineapple core on your pineapple and include it in your smoothie. I was walking past Mr. Blendtec salesman dude at Costco the other day (why does the idea of buying my blender all over again excite and intrigue me?!?!?) and he said, "Leave the core on the pineapple as that is where most of the vital nutrients are contained. The blender will make it smooth as ever."


Sour Mango + Spinach Green Smoothie (or Green Drink)
Adapted By Aimee Henrikson (my sister!) from Diana Stobo

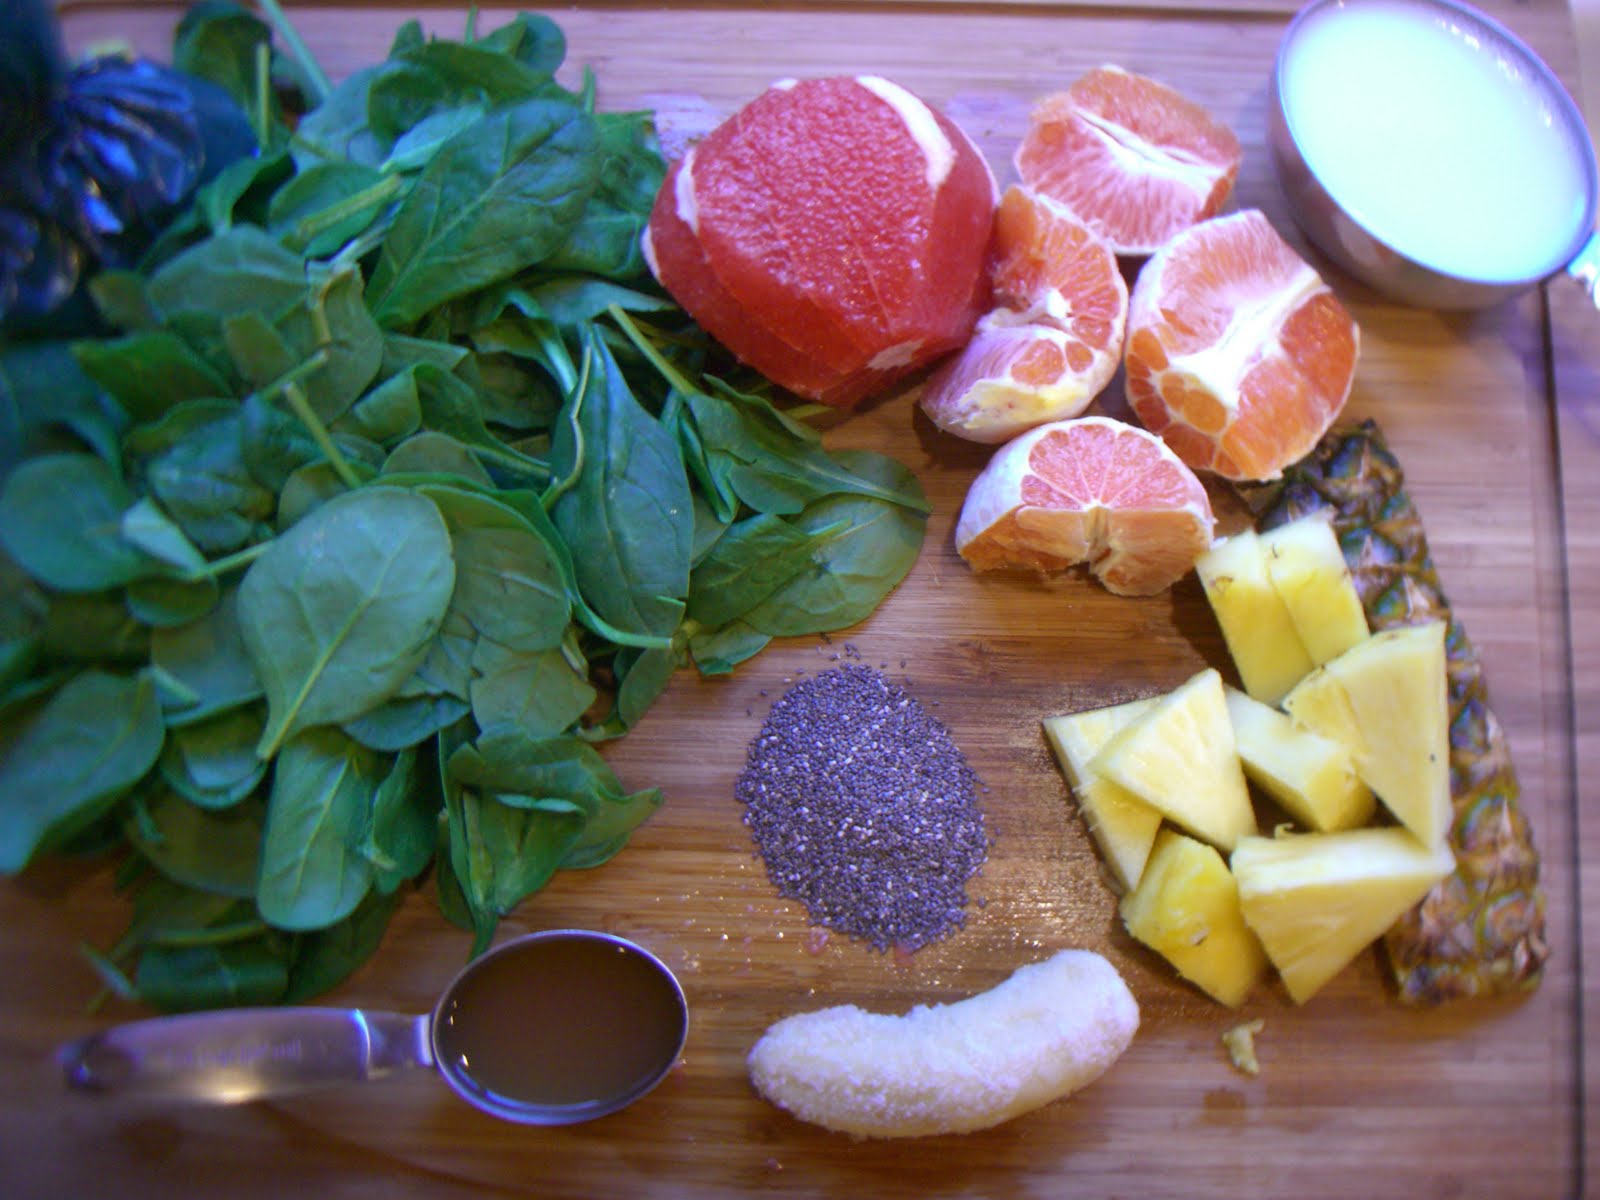
1 cup vanilla or plain kefir, coconut kefir, soy yogurt or plant milk
1 cup water
1 grapefruit, bitter skins and piths removed (see citrus avocado salad on how to fancy-peel citrus)
2 peeled oranges
2 cups fresh spinach (or more if you are aiming to incorporate more greens)
1-3 TBSP apple cider vinegar (according to how sour you like it, I love 1/4 cup!)
1 heaping tablespoon green powder (optional, I use Ormus Supergreens which really adds flavor)
1 cup mango or 1 cup peaches, depending on your preference (fresh or frozen)
1/8 – ¼ of a fresh pineapple depending on your desire for sweetness
2-3 Tbsp Chia seeds or flax seeds (to get your omegas and fiber, and attain a feeling of fullness)
1/2 frozen banana (optional, for added creaminess and sweetness)
½ to 1 cup ice

Layer in blender the liquids, then soft foods, then frozen foods. Blend well. Can add ice and the water if you want it colder and less thick.

I put this in my WildSide larger blendtec blender and I have to smash it down to make it fit. The blender has to really work to get it fully blended so if you do not have a WildSide Blendtec, halve the recipe.


Sunday, January 15, 2012

Raw Tahini Dressing (Oil Free)

From Natalia Rose's "Raw Food Detox Diet."


At times we all struggle to make ourselves eat raw salad. Cold.

I make this oil free dressing when I feel like I need something that feels warm.

By far, it's one of my favorites! Yesterday I spread it on mixed greens, organic chopped zuchinni and shredded carrots with chopped tomatoes. YUM!

It is comforting, creamy, and very healthy. So delicious on salads, it can also be used as a veggie dip or a spread in a panini sandwich or bean burrito. Enjoy!


RAW TAHINI DRESSING

Makes about 4 cups

1 cup raw tahini
¼ teaspoon cumin
½ teaspoon coriander
3 tablespoons apple juice concentrate
l clove giarlic
2 tablespoons Nama Shoyu soy sauce (or Bragg’s Liquid Aminos)
1 tablespoon lemon juice
1 stevia packet (if more sweetness is desired)
1/3 cup apple cider vinegar
½ cup water

Blend all ingredients except water in a blender until smooth.

This mixture thickens in the refrigerator. Add the water to dilute before serving.


Tahini is finely ground sesame seeds, and can be found at any health food store in a jar in the condiments section. However, I have also found it in the wet bulk foods section at Whole Foods Market. It doesnt have to be raw.