Showing posts with label dairy free. Show all posts

Friday, January 25, 2013

Pizza Foccacia and The Story of How My Fridge Died


My dear friends. I have wanted to write all week.

Rewind to Monday.

I peeked in the fridge, as we are all apt to do, and found that everything in my freezer was melting. Ice was turning into water, my frozen bananas were no longer white and pretty, but brown and mushy. Something was not right.

The temperature in the fridge was 50 degrees F (supposed to be 38 F) and the temp in the freezer was 38 degrees F (supposed to be 0 degrees F). Everything was much too hot, hot, hot.

Seeing the abnormal temperature, I called our repair-woman to have a look at it, thinking that simply the refrigerator needed to be reset. After an hour or so of working with, taking apart, hot-wiring, and looking at my fridge, the diagnosis was in.

My fridge was dead.

I was shocked. I did not expect a five year old fridge to die. My parents' fridges have all lasted what seemed like 20 years!


My beautiful, $1,800 dream fridge that Paul saved and saved to buy me as a gift five years ago when we first moved into this house. He had been saving that money for other important things...like our future, or our children's future... Instead, he plopped down a lot of money to get me new appliances.

He saw me struggle. No dishwasher. The worst stove on the planet that was 20 years old and had only two settings: simmer, and scorch. A broken trash compactor, and a 20 year old, tiny fridge.

It didn't really sink in at first. Until Paul and I went fridge shopping and saw that the same type of fridge now cost $2,400, plus tax and delivery. Ouch.

Major ouch.

We went home feeling sick. Woke up feeling even worse. How can we possibly feel good about spending that much money on a fridge? Paul pointed out that the amount is the same as the cost of a car! When we bought the fridge in the first place, we thought we would have it for a very long time and therefore had justified the purchase.

And it didn't help that we were now having to throw everything in the fridge away.

It felt like we were camping in our house. Only worse.

My kitchen became dysfunctional.


Fridge food all over the counters, fridge parts strewn everywhere.

It doesn't seem like something as simple as not having a fridge would bring life to a screeching halt. But when you are eating mostly plants? When you thrive on a lot of raw food, and cooked veg?

I boxed up all of our food.


Something I am really grateful for is the cold. Outside. Right now. I am so glad that it is winter time and that our great outdoors can act as a pseudo-fridge until we can figure out what to do.

Paul put it outside.


We went fridge shopping again yesterday and came home hungry and tired. It's been well over a week since I have done any grocery shopping, and so our options seamed meager under the circumstances.

I needed something easy.

At first, I was convinced I would make my easy Calzones that my kids love. Despite how easy the filling is to make (as fast as a green smoothie in the blender) I couldn't bring myself to do it. Not to mention I couldn't find all the ingredients in my messy kitchen.

And so I dreamed. Of something even easier.

Pizza Focaccia.

My bread machine did all the work. I broke all the rules. And used Extra Virgin Olive Oil.

This is the kind of recipe you make if your kitchen is all torn apart.


The kind of recipe you prepare when you can't think straight, and you really don't want to hear any complaints from your kids about food.


The kind of food you eat when you are low on produce and you just need some comfort.


The rosemary, basil, and olive oil took me to The Olive Garden.

Right where I needed to be.


Pizza Focaccia (with a Gluten Free option)
Inspired by, and Adapted from, Eat, Drink and Be Vegan

Makes 4-5 servings as a side bread for a meal.

Note from Dreena: Fresh rosemary really gives this pizza a wonderful taste and aroma. If fresh rosemary is not available, you can substitute with 3/4-1 tsp dried rosemary, coarsely chopped, or crushed between your fingers.

Note from Ashlee: Many fellow moms have mentioned to me that when going plant-based, pizza becomes difficult for kids. I really recommend this easy, tasty option.

You can make whole grain, homemade pizza dough, or purchase it pre-made from the store to make this meal even easier. I was able to serve this with marinara for dipping, (which I did not use with my bread because I savored the taste without it!) with a large salad, oil free dressing, and a lot of cut fruit and pomegranate juice for my kids. They loved the bread. Toppings can easily be tailored to whatever you or your children prefer to eat. Chopped bell peppers, fresh pineapple chunks, black beans, green chile, olives, red onion, spinach, basil, etc.

Just make sure you add the rosemary, basil, salt, pepper and olive oil because that is where the flavor really pops. Be careful not to overload the bread with too much veg, or it will become soggy and the rosemary will taste less pronounced. I recommend you keep it simple the first time around you make it, and really focus on the fresh herbs and seasonings.

TO MAKE THIS GF: Bob's Red Mill brand carries a gluten free pizza crust flour mix that is easy to make by following the directions. Also, I have seen pre-made Gluten Free pizza dough in the freezer section at Whole Foods Market and Sprouts.


Ingredients:

1 whole wheat pizza dough (I used the dough recipe from my Calzones, see below)
1 tablespoon extra virgin olive oil
1 1/4 to 1 1/2 teaspoons fresh rosemary (or use 3/4 to 1 tsp. dried rosemary, coarsely chopped)
1/3-1/4 teaspoon sea salt, to taste (I used 1/3 tsp)
Freshly ground black pepper to taste (I used fresh ground Rainbow Peppercorns)
1/2-1 tablespoon extra virgin olive oil
1/4 cup fresh basil, julienned, or chopped
Optional additional toppings we enjoyed:
Black olives, chopped, about 1/3 cup
Red onions, chopped, about 1/3 cup

Chopped green chile, or roasted red pepper flakes sprinkled on top could really add some heat if that's what you like! I have not yet tried the green chile, and it may compete with rosemary too much for flavor, or be soggy. But it is an idea. See my note above for other topping ideas.

Directions:

Preheat oven to 425 F (220 C). Line a baking sheet with parchment paper. Using a pastry brush, spread 1 tbsp oil over top of shell, then sprinkle on rosemary, salt, and pepper, and lightly sprinkle with any additional toppings of your choice. Bake for 9-13 minutes (mine baked in about 13 minutes), until edges are golden. (If using a frozen pizza shell, you will need to bake for another 3-5 minutes.) Remove from oven and drizzle 1/2-1 tbsp oil over the hot bread, then sprinkle on basil. Cut into slices or wedges.

Serve with a large salad and fresh cut fruit. I also made additional toppings available for my son who loves olives.


Pizza Dough for Bread Makers
(makes 2 lb size)

Ingredients:

1 1/2 cups warm water
2 TBSP olive oil
2 tsp. salt
1 and 3/4 cups unbleached, all purpose flour
2 cups white whole wheat flour, or sprouted whole wheat flour (found mine at Whole Foods Market)
3 tsp. sugar
1 tablespoon gluten flour (optional, helps the dough to rise and be fluffier)
2 tsp. yeast

Combine all ingredients in your bread-maker, in the order listed. Set the bread-maker to the "Pizza Dough" setting (about 55 minutes) and push start.


**********

Robyn Openshaw of Green Smoothie Girl mentions in her healthy book that Foccacia served with a large salad is one of her and her children's favorite meals to have for dinner. Somehow this makes me feel a whole lot more confident in serving this meal.

Other foods we've been enjoying that are easy in this time of chaos:

Rice Pudding
Bok Choy Saute (yes, again!)
Light and Tender Waffles (none of the ingredients need refrigerated!)
Seasoned Quinoa, a modified version that I need to update

Friday, January 11, 2013

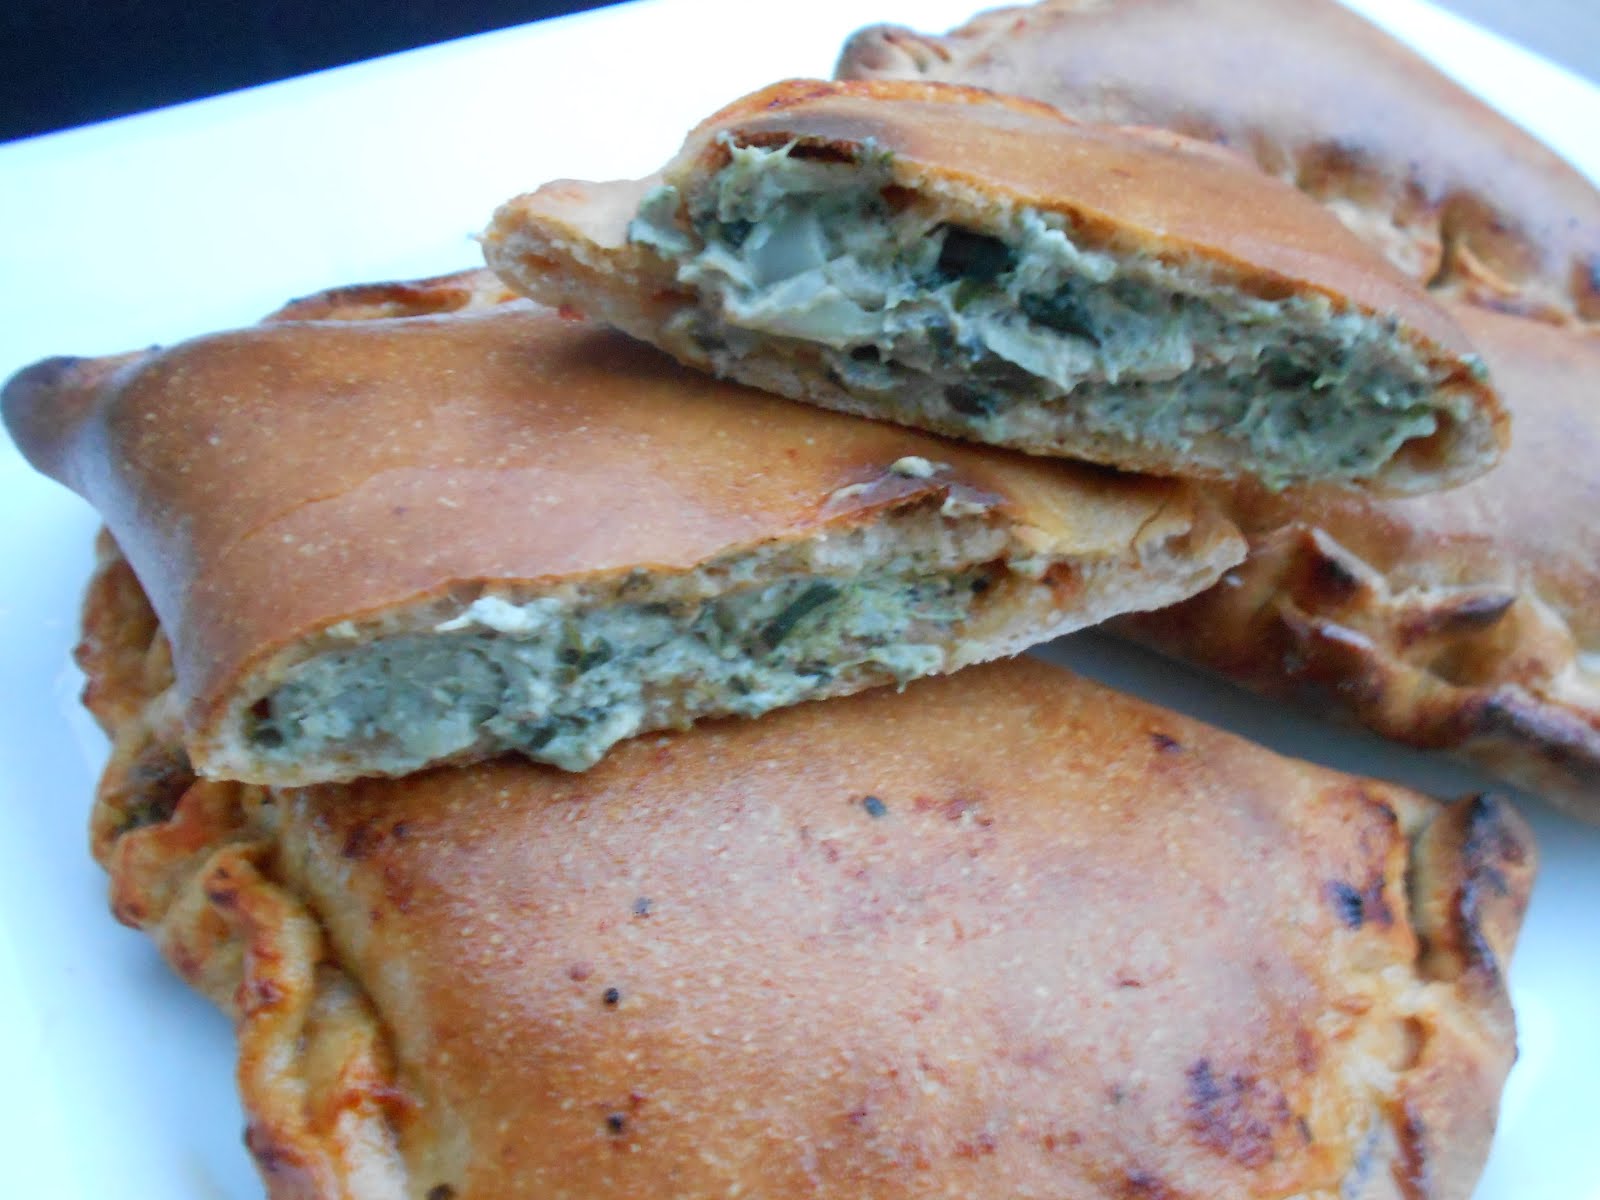
Family Friendly Calzones...Or Pizza Pockets?


Cheesy. Creamy. Popping with flavor and pizza zang (my new word). Stuffed with healthy ingredients. The flavors meld together with warm pizza crust and marinara sauce.


It's been over three months, I am sure, since you asked me to make perfect these.

I've been thinking of your request, on and off, the whole time.

At first, it didn't seem like a difficult task. I had a basic recipe on hand that I had used for Calzones before.

But then.

I got to work on it.

And I realized I needed to rethink the recipe. The one I had on hand was good, but I felt that it was really not good enough. I wanted my kids to love it. Your kids to love it.

I basically, really, just wanna' see it gobbled up.

You've waited a long time. Never complained. Many times your comments, compliments, and encouragement have kept me going. You are a wonderful friend.

I know the challenges you face with trying to get your kids and hubby to really love eating plant based. Ah. Don't we all face some level of this challenge? Trying to get our families to enjoy eating healthier foods?

So I didn't take your request lightly. These Calzones needed to meet some high standards. I poured over books, brainstormed, consulted with other cooks.

Then I made a list of standards that these little Pizza Pockets had to live up to.

* Made with everyday, recognizable ingredients
* Kid-approved (and LOVED!)
* Nutrient dense (chock-full of healthy stuff)
* And still taste good
* No tofu (really? Tofu in my pizza? No thanks)
* Suitable for guests
* Easy (not an all day experience...or so-called, "labor of love")
* Only 2 or 3 main steps
* Variation-friendly (I provide a list of sauteed veg that would taste great as an add-in, or variation for toppings for the filling)

The standard of "No tofu" turned out to be a big deal. Most of my favorite cookbooks had recipes for Calzones, but inevitably, all of them used tofu as the main ingredient; throwing in a bit of spinach here and there for variety.

I just can't imagine handing an omnivore a tofu stuffed calzone, or even putting one in front of myself, and expecting myself or my lovely omnivore guest to want to eat said calzone. I like variations on tofu...but in my pizza???

And so. I have not forgotten you.

In fact, as soon as the right idea finally came to me yesterday, I was so excited I had all kinds of butterflies in my stomach. I was finally going to deliver what I had promised. I cannot tell you how badly I have wanted this moment to come.

Easy, home-made, pizza pocket goodness.


Have I told you lately? How much I care?

Because you and your friendship are SO. SO. WORTH IT!

The crust can be homemade, made in a bread maker, or store-bought. The marinara, or pizza sauce, likewise can also be homemade or store-bought. I use store-bought for ease and simplicity.

The filling takes as little time as it takes to put together a green smoothie.


With similar steps, and a short baking time. It contains 2 cups of artichoke hearts, and 2 cups of spinach. 3/4 cup of cashews, blended with lemon juice and seasonings make up the cheesy part of the recipe.


I will first show pictures, with detailed instructions and tips, and then show the posted recipe with the same detailed instructions below, for ease of keeping the information all together so that it can be copied, pasted, and printed. (I wish I had printable recipes option!)

The three main steps?

1.) Make pizza dough
2.) Make Creamy Artichoke Spinach Filling/Dip
3.) Put it all together and bake in the oven for 12-15 minutes, at 500 degrees.

Let's get started!

Assembling your Plant Infused Calzone:

When pizza dough is complete/ready, divide in half evenly. Rolling out only half of it at a time. Make sure to flour the surface so the dough doesn't stick.

After rolling/spreading it out into a smooth circle, I cut mine with a knife, on a smooth surface (my cutting board), into four equal parts.


Spread with marinara (or pizza sauce). I use Prego brand; use your favorite, or home-made.

Keep the sauce toward the center of the crust. You want dry edges so that they will fold and pinch together to seal the pockets/calzones.


Then, put about 3-4 tablespoons of pre-baked spinach artichoke filling on each calzone, again keeping it toward the center so that you have dry edges.


At this point, I would recommend adding in extra vegetables on top of the filling for the veg loving people in your life!

Some VEG Toppings that I think would work well:

* Sauteed, sliced mushrooms
* Sauteed, thinly sliced red onions
* Sauteed, thinly sliced red bell peppers
* Samuel loves black Olives, chopped or sliced
* Essie loves black beans in her pizza
* Roasted Green Chile...maybe? Sprinkled on top?
* Additional steamed, or sauteed, chopped spinach

Fold each calzone in half, bringing the two, straight matching edges together.

Then fold the matched edges; the bottom edge over the top edge, pinching the edges together at the same time, so it looks like this.


Just a tip: pinch really hard. That way it stays together. It's actually okay if it splits open a bit during cooking.

After the pocket is sealed, press gently down on the filling so that it fills up all spaces inside the pocket; evenly distributing the filling for savory, cheesy goodness in every bite.

With a spatula, and your hands, carefully transfer the folded, sealed calzones to a lightly oiled or nonstick baking sheet. You could probably also use parchment paper as a nonstick surface.


Repeat with the other half of the pizza dough.

Bake in a 500 degree pre-heated oven, for 12-15 minutes, until golden in color. Remove from oven, and optionally brush the tops with nondairy butter. Let cool for about 10 minutes.

SERVE, WITH A SIDE OF extra MARINARA SAUCE FOR DIPPING/DUNKING!


Spinach Artichoke Calzones
Modifications by Ashlee Crozier

Don't be frightened by the detailed instructions!

These are really, really easy, and quick to make. Especially if you have pre-made pizza dough, which, I do not frown upon.

Hey, make life easier.

Nor do I frown upon the use of store-bought marinara sauce. (I don't provide a recipe for marinara sauce, but you will need some for this recipe).


Pizza Dough for Bread Makers
(makes 2 lb size)

Ingredients:

1 1/2 cups warm water
2 TBSP olive oil
2 tsp. salt
2 cups unbleached, all purpose flour
2 cups, scantly measured, white whole wheat flour
3 tsp. sugar
1 tablespoon gluten flour (optional, helps the dough to rise and be fluffier)
2 tsp. yeast

Combine all ingredients in your bread-maker, in the order listed. Set the bread-maker to the "Pizza Dough" setting (about 55 minutes) and push start.


Creamy Artichoke Spinach Dip
By Dreena Burton

A delicious, dairy-free artichoke and spinach dip made without any cream or cheese substitutes, and also without any oil.

Note from Ashlee: My kids love this as their filling for calzones, or as a dip. Either way, they gobble it up.

Ingredients

(serves 5-6)

3/4 cup raw cashews (unsoaked)
3/4 cup plain unsweetened non-dairy milk (I like almond or soy, but your choice)
2 1/2 - 3 tbsp freshly squeezed lemon juice
1-2 medium-large cloves garlic (use less/more to taste)
3/4 tsp sea salt
1/2 tsp dry (ground) mustard
freshly ground black pepper to taste
2 cups frozen artichoke hearts, partially thawed (helps for pulsing in blender)
2 cups (loosely packed) spinach leaves (I used frozen, heaping 2 cups, to get in more spinach)

Instructions

Preheat oven to 425. In a blender, first add cashews, milk, lemon juice (I like the full 3 tbsp for tanginess), garlic, salt, dry mustard, and pepper. Blend until very smooth. (If using Blendtec (purrrrr) or other high-powered blender, this will only take a minute or so. If using a standard blender, keep blending until very smooth. Add artichokes and spinach and just PULSE through. Do not fully blend, keep some chunky texture! Transfer to an oven-proof baking dish, and bake for 17-20 minutes.

Remove and say ‘ahhhh’.

Assembling your Calzones:

Make Pizza Dough. While the dough is rising, prepare and bake Creamy Spinach and Artichoke Filling/Dip.

When dough is complete, divide in half evenly. Rolling out only half of it at a time, be sure to flour the surface so the dough doesn't stick.

I cut mine with a knife, on a smooth surface (my cutting board), into four equal parts. Spread with marinara (or pizza sauce); about 2-3 tablespoons of sauce for each calzone. I use Prego brand; use your favorite, or home-made. Keep the sauce toward the center of the crust. You want dry edges so that they will fold and pinch together to seal the pockets/calzones.

Then, put about 3-4 tablespoons (you can experiment with different amounts, to find what works for you) of pre-baked spinach artichoke filling on each calzone, again keeping it toward the center so that you have dry edges.

At this point, I would recommend adding in extra vegetables on top of the filling for the veg loving people in your life!

Some VEG Toppings that I think would work well:

* Sauteed, sliced mushrooms
* Sauteed, thinly sliced red onions
* Sauteed, thinly sliced red bell peppers
* Samuel loves black Olives, chopped or sliced
* Essie loves black beans in her pizza
* Roasted Green Chile...maybe? Sprinkled on top?
* Additional steamed, or sauteed, chopped spinach

Fold each Calzone in half, bringing the two, straight matching edges together. Then fold the matched edges; the bottom edge over the top edge, pinching the edges together at the same time, kind of how you would seal a double pie crust.

Just a tip: pinch really hard. That way it stays together. It's actually okay if it splits open a bit during cooking.

After the pocket is sealed, press gently down on the filling so that it fills up all spaces inside the pocket; evenly distributing the filling for savory, cheesy goodness in every bite.

With a spatula, and your hands, carefully transfer the folded, sealed calzones to a lightly oiled or nonstick baking sheet. You could probably also use parchment paper as a nonstick surface.

Repeat with the other half of the pizza dough.

Bake in a 500 degree pre-heated oven, for 12-15 minutes, or until golden in color. Remove from oven, and optionally brush the tops with nondairy butter. Let cool for about 10 minutes.

SERVE, WITH A SIDE OF extra MARINARA SAUCE FOR DIPPING/DUNKING!

Wednesday, December 19, 2012

Christmas Cinnamon Rolls, Guilt Free


It's been interesting to see my fav veg blogs post recipes for beautiful Christmas cookies. I am so glad they are posting them, because I haven't made a single cookie. Not one during this Christmas season.

It took me a while to figure out what was wrong with me...Ash, why aren't you making any cookies?! And then I realized, Oh, (picture the Fiddler on The Roof, and Tevia shouting) TRADITION!

All growing up it was our family tradition to have cinnamon rolls for Christmas breakfast. One of my favorite parts of Christmas, for sure. When we got to be a little older, and realized just how much work my parents went to in order to make Christmas the biggest event of the year, my oldest sister and I took over on Christmas cinnamon-roll-making-duty.

Then, we all got lazy, and decided to turn to Rhodes. Ah, Rhodes Cinnamon Rolls from the frozen foods section. Yummy stuff.

I usually ate about three or four of them...Once I start eating something delicious, I really cant seem to stop. When I got old enough to realize what I was doing to myself, and recognized that they made me feel sick, I also started realizing how guilty I felt after eating so many cinnamon rolls.

Seriously, how do you feel after sitting down to a Cinnabon cinnamon roll at the mall, and consuming the entire confection?

Like running a marathon?

Like shouting for joy?

Right. Me either. I feel like a big fat bump on a log. Someone ROLL me down the hall because I just ate a year's worth of fat and junk in five minutes. But then, despite how I feel physically, I really feel like I wouldn't mind eating another one. Yeah, that's me.

Every time I eat one of these delicious, marvelous, oil and dairy free cinnamon rolls, they taste so good to me, that my cinnamon-roll-eating guilt returns.


I start quizzing myself.

Okay, I should feel guilty because...let's see these have no oil in them...no butter, no eggs, no cream, no dairy...and they are made with whole grain flours...I know there has got to be something in these warm, ooey, gooey, SIN-namon rolls that I should feel guilty about!

I'm healing. How about you? Learning to not feel guilty because I enjoy my food.

Healthy desserts.


After all, I'm pretty sure Christmas is supposed to be all about joy.


Christmas Cinnamon Rolls
Adapted from Seven Secrets Cookbook

Ingredients:

One Loaf Bread (The Dough)


This bread recipe is the right amount for one loaf, and works in most bread machines. This recipe can be used to make bread, pita pockets, pizza crust, and in our case, cinnamon rolls. Oil and dairy free never tasted so good!

As to which types of flour you choose, I have made these with half unbleached all-purpose, and half white whole wheat, all white whole wheat, and with completely all-purpose flour. Each version raised well and tasted great. If you are going for a healthy breakfast, choose either half whole wheat and white, or all white whole wheat. If you are going for a very dessert-y, copycat Cinnabon mall experience, use only unbleached, all-purpose flour.

Use either date paste, or brown rice syrup and sugar filling, depending on your preference. I also provide two different types of icings, or you can simply pour maple syrup on top of your roll for a more " cinnamon roll pancake" type of breakfast experience. My kids and I prefer the brown rice syrup filling, with the cream cheese icing.

1 1/4 cups warm water
2 tablespoons applesauce
2 tablespoons honey (or agave nectar)
1 teaspoon salt
3 cups whole wheat bread flour (I find that white whole wheat flour works best)
1 tablespoon gluten flour
1 tablespoon dough conditioner (optional, I didn't have any)
2 teaspoons active dry yeast


Directions:

1.Place ingredients in bread machine container according to manufacturer's instructions. Once the bread maker has completed it's full cycle, roll the dough out into a long rectangle. Apply a thin layer of filling (see below, either date spread, or brown rice syrup mixture) over the surface, leaving 1/4 inch along one long edge free of spread.

2. Sprinkle entire surface liberally with cinnamon. Optionally, you can also sprinkle it with raisins, or other dried fruits and/or chopped nuts of your choice. We like it best without anything added except the filling. Roll up the long way like a jelly roll, and pinch the seam closed.

3. Cut 1-inch rolls by cutting all the way through with a sharp knife or kitchen shears. Place rolls with cut side up on a cookie sheet lined with parchment paper, shaping into a circle. Let rise, covered with a damp towel, in a warm place for about an hour or until doubled.

4. Bake at 350 for about 20 minutes or until lightly browned. Lightly brush tops with pure maple syrup or cream cheese frosting while hot (optional). Cool on a wire rack, then place in covered container until ready to eat. These taste best when warm. If they have cooled, simply place in the microwave for about 15-20 seconds to reheat, and soften. Enjoy a guilt-free, sinless cinnamon roll! (Or if you are like me, enjoy two or three!)

For the Filling:

Note from Ashlee: This spread is great because it adds body and flavor without oils or fats. It tastes the best if the cinnamon rolls are going to be eaten the same day they are baked, or when the cinnamon rolls are very warm. Once the cinnamon rolls cool, the date paste tends to get chunky. Reheating helps, but the date filling tastes the best when fresh from the oven. Make sure you only spread a thin layer, as this will prevent the paste from getting chunky the day after baking.

Date Spread

Ingredients:

2 1/2 cups pitted dates, or date pieces
1 cup water
1 teaspoon vanilla
1/4 teaspoon salt

Directions:

Bring all ingredients to a boil in a covered saucepan. Mash or process in food processor to make a thick paste. Or blend in a blender, adding a little extra water if needed, to blend until thick and smooth. (After spreading a very thin layer of the date paste, be sure to sprinkle generously with cinnamon before rolling the dough into a "jelly roll" to enjoy that cinnamon taste!)


Brown Rice Syrup and Brown Sugar Spread

Note from Ashlee: This filling is my own invention, and my personal preference as a fat free filling for cinnamon rolls. The hardest part is preventing it from becoming too runny; when that happens, all the filling oozes out of the dough. However, if that happens, the majority of the flavor remains on and around the roll during baking, and still tastes wonderful. I like this filling especially because it tastes great reheated, and retains it's flavor and texture the next day. Even at room temperature. Brown rice syrup is also a much cheaper and a faster alternative to using 2.5 cups of boiled and mashed dates!

Ingredients:

1/4 cup brown rice syrup
2-4 tablespoons brown sugar
1 teaspoon applesauce
2 teaspoons cinnamon

Directions:

In a small bowl, combine all the ingredients with a fork, until well incorporated. If the mixture is too thick and too difficult to stir, consider adding an additional one teaspoon of applesauce. However, also remember that the mixture will soften on the dough. You don't want it to become runny or the filling will ooze out of the inside of the cinnamon roll when the dough is being rolled. If you want it to be thicker, add additional 2 tablespoons of brown sugar.

Spread a layer over the rolled out dough, leaving a remaining 1/4 inch of the dough dry. The dry portion of the dough makes it possible for the cinnamon rolls to seal shut when rolling the dough into a "jelly roll."


Cream Cheese Frosting:

1/4 cup nondairy cream cheese (I use Tofutti Better Than Cream Cheese brand)
1/2-1 cup confectioner's (powdered) sugar
1 teaspoon pure vanilla extract
non-dairy milk, as needed

Whip cream cheese, powdered sugar, and vanilla extract until they become light and fluffy. If it becomes too thick, add nondairy milk, a teaspoon at a time, until it is thinned to desired consistency. If it is too thin, add more powdered sugar.

Pour generously over cinnamon rolls while they are still warm!


Maple Icing:
From Lindsay S. Nixons, "Happy Herbivore."

1 cup confectioner's sugar
2 tablespoons pure maple syrup
1 teaspoon ground cinnamon
1 teaspoon vanilla extract

Combine all ingredients in a small bowl, whipping to combine. Add more maple syrup for a thinner icing, or more sugar for a thicker icing.


**********

I have tried to make oil free yeast breads before, and it has turned out abysmally. I thought for sure the dough would not rise. I basically was preparing myself for massive failure.

I was so happy when it actually rose! I had to run into the next room to show Paul that it wasn't a complete doozy of a recipe.


You can see here, how the filling was a tad too runny and came out a little bit because I added too much applesauce.


If this happens, just scoop up the filling and pour it on top of the cinnamon roll after it has been placed on the cookie sheet. To prevent this from happening, be careful not to add too much applesauce to the brown rice syrup and Brown Sugar Filling. Or, use the date spread, which is not runny at all.

I was equally as ecstatic when I discovered that they raised beautifully again, the second time, as rolls.


They baked to perfection. Cinnabon in my kitchen...


I've since made these cinnamon rolls several more times, and my children heartily gobble them up, asking for seconds. (PROJECT VEGAN KIDS!)

The whole wheat versions bake up just as nicely, and feel healthier when eating them.


The icing, is, well, the icing on the cake! It is so good! (And might I add, pretty too?)


**********

What is your very favorite Christmas treat that brings back happy memories from childhood? Have you had any success (or fears!) in trying to re-make it into a healthier version?

Any Christmas/Holiday recipe you would like to see transformed into a whole food here on this blog?


Wednesday, November 14, 2012

Thanksgiving Breakfast and Power Snacks; 3 recipes to Fuel Your Day

Thanksgiving or Christmas fab, quick, and filling breakfast and snack ideas.

All of which are Gluten Free. Easy. And low in fat.

First, cake for breakfast.

Yes.

Carrot cake.

In oatmeal form. You will think you are eating cake. Literally.


Guilty confession: I was eating the oatmeal as I was snapping pictures. I couldn't help myself.


The first words out of my mouth after trying my first bite: "Oh, Heavens."

Paul's first words: "Wow, this tastes exactly like carrot cake."

You can have confidence in following the recipe exactly, and ending up with the best. breakfast. ever.

Carrot Cake Oatmeal
From Angela Liddon over at www.OhSheGlows.com (she has gorgeous photos, hop on over and take a look!)

Note From Angela: This one is for all of the carrot cake fans out there! Creamy, crunchy, chewy, and sweet, this recipe packs in a full cup of carrots and a handful of healthy ingredients that will keep you feeling full for hours and hours. This oatmeal is also wonderful as part of a holiday breakfast with loved ones. If you are adapting this recipe for several people, I suggest pouring the oats into a large casserole dish when they are ready, adding your toppings, and using a large spoon to scoop portions onto plates or bowls.

Note from Ashlee: I have only tried the low-fat version. Which excludes the nuts, shredded coconut, and coconut cream (I use almond milk instead). I suggest following this version if you are avoiding higher fat foods. I loved it this way and was full for hours. The only change I made besides reducing the fat was to double the recipe.


Yield: 4 servings

Ingredients:

2 cups finely grated carrot (about 2 large)
2 cups almond milk
2 tbsp full-fat coconut milk cream (or use more almond milk)
2 tsp ground cinnamon, to taste
1/4 tsp ground ginger
1/4th tsp ground nutmeg
pinch of salt
1 cup regular oats
2 tsp pure vanilla extract
1/2 tsp lemon juice (optional, I didn't add this)
2 tbsp chopped walnuts, divided
2 tbsp raisins, divided
4 tbsp pure maple syrup
4 stevia packets (optional, for added sweetness)
1 tbsp sweetened shredded coconut, for garnish
1 tbsp coconut milk cream + 1/2 tsp pure maple syrup, to garnish (optional)


Directions: Finely grate 1 heaping cup of grated carrots. You want to use the fine grate and not the large one so the carrot shreds are very small. This helps the carrot blend in more.

In a medium sized pot over medium heat, whisk together the almond milk, optional coconut milk cream, cinnamon, nutmeg, ginger, and a pinch of salt.

Stir in the grated carrots and oats. Adjust heat if necessary or bring heat to low if it starts to boil. Cook for about 8-9 minutes, stirring frequently. When the mixture has thickened up, remove from heat and stir in the vanilla extract, 1 tbsp walnuts, 1 tbsp raisins, and 4 tbsp of maple syrup. Remove from heat and portion into bowls.

Top the oatmeal with the remaining walnuts, raisins, and shredded coconut. If you are using coconut cream, you can mix a bit of the cream with maple syrup and drizzle on top of the oatmeal, as shown in the photo. Sprinkle with cinnamon for garnish.

**********

Megan loved this stuff so much that she stole Paul's oatmeal, and then scooted a little chair up to the stove to devour the pot!


**********

Something green. Nutrient-packed. Creamy.

Delicious.


Sweet apples, combined with creamy bananas and creamy sweet dates, some almond milk. Jam-packed with baby kale or spinach.


Apple pie in a jar.

Your taste buds and energy levels will be very happy.


Apple Pie Green Smoothie
By Ashlee Crozier

Ingredients:

2 cups baby kale or spinach, tightly packed and heaping (don't be shy! really pack it!)
1 and 3/4 cup almond milk
2 ORGANIC (NO CHEMICAL SHAKES, HERE!) large Gala apples, or other sweet apples
1 1/2 to 2 frozen bananas
1 1/2 teaspoons cinnamon
1/4 teaspoon nutmeg
6 Deglet Noor Dates (or 3 medjool dates, but I have not tried using medjool yet)
4 stevia packets
1 cup ice

Directions:

Put almond milk and greens (spinach or baby kale both taste great) in blender and blend until all greens are pulverized.

Add remaining ingredients and blend until smooth.

I like to blend the greens first, with the milk, so that I have enough room to add more greens (on my ambitiously green days) and room for the remaining ingredients without killing my blender.


I was introduced to deglet noor dates by my sister, Aimee. They are only 26 calories per date! They are so delicious. I bought mine at Costco -- huge tub! Perfect in this shake, and they don't give me a tummy ache like blended medjool dates sometimes do.


**********

Lastly, pumpkin pie smoothie, revisited.

Lower in fat. Quite delicious. Ready in minutes.


Pumpkin Pie Smoothie, Revisited (Low Fat, Easy prep)
By Ashlee Crozier (inspired by this smoothie)

Note From Ashlee: Removing the chia seeds and oatmeal also removes the issue of the shake being too thick. It also means you can have your insta-shake; no more overnight preparation. That's more like it! I feel very hydrated after having this snack, and it meets all of my energy needs for hours. Yummy little treat.

Ingredients:

2 cups almond milk
1 and 1/4 cup canned pumpkin
1 tsp blackstrap molasses
1 1/2 frozen ripe banana
2 tsp cinnamon
1/4 tsp ground nutmeg
1 cup ice cubes (creates better texture, and makes it cold which enhances flavor)
2 tbsp pure maple syrup
3-4 packets of Stevia (don't skip! This makes the smoothie sweet without adding sugar!)

Instructions

1. Throw everything in your blender all at once.

3. Blend until smooth. One full cycle in my Blendtec does the trick. Drink, and enjoy!


**********


I hope to be able to post two fabulous main dishes to grace your Thanksgiving table. They are loved by meat-eaters and vegetarians alike.

I am also re-working Cauliflower Bechamel to taste similar to Chicken Alfredo. Loved by my kids, and taste testers (thanks, Rachel!).

We leave this Saturday morning for California.

Are you traveling for Thanksgiving?

How do you survive the Holidays and stay healthy?

Paul says he will have Turkey on Thanksgiving day, just to shake off the title, "vegan." He says he's a whole foodist, not a vegan.

Wherever you're headed, I hope you stay safe!


Friday, October 19, 2012

Coconut Banana Muffins & Fruit Salad; A Plant-Powered Breakfast

Coconut Banana Muffins. Our favorite muffins.


And fruit salad. Simple. Breakfast.


I've had some recipe requests.

And I am behind.

Fruit Salad.

Lemon cake.

Calzones.

And one other...oh, now I can't remember. I haven't forgotten you, though!

My sister, Aimee, requested the fruit salad. It's a simple recipe, but I really liked the flavor combinations. My kids ate it out of the bowl. Except Essie, who won't touch cantaloupe.

Isn't it interesting to see the things our kids don't like. I love cantaloupe.

Sometimes I don't want to drink my breakfast. I want to chew it.

Sometimes I actually eat green, leafy salads for breakfast.

Don't blame me, blame my Mom. Who first gave me the crazy idea. I think it's yummy. And no tummy ache in the morning from sugary cereals, all that stuff.

Salad for breakfast, haven't you heard? It's the new thing!


Simple Fruit Salad
By Ashlee Crozier

Ingredients:

1/2 cantaloupe, seeded and cut into small cubes
1 orange, peeled, and sliced, then cut the slices into bite-size pieces
1 bartlett pear, ripe, sliced and diced (core removed)
2 small bananas, or 1 very large banana, cut into coins
2 large handfuls (or more) of blueberries, (or grapes, in season)

Directions:

Thoroughly wash your blueberries and pear. Cut each kind as indicated. After cutting all of your fruit, gently toss them all together (except blueberries) in a pretty serving bowl until well combined. Sprinkle with a few handfuls of blueberries, for color and flavor. Eat hardy.


To complement your fruit salad.


These are some of our most favorite muffins. I modified them to be oil free. I actually have also tried making them with oil, and I did not like them nearly as much. The soy yogurt seemed to intensify the flavors. And when I eat these, for me it is reminiscent of a donut. Except these don't make me feel like I ate a donut.

My family loves them. I have to double the recipe, and still they are gone within half a day. Great for lunches. Great for on-the-go. They are just great.

I actually am going to make these again for breakfast today, for my kids. And pack it in Essie's school lunch.

This could be a great weekend breakfast, too!

Coconut Banana Muffins
Modified to be oil free from Dreena Burton's "Let Them Eat Vegan!"

Makes 11 small to medium muffins


Topping: (optional) (I never use it because it requires oil, and I like my muffin unadulterated. It's less work and just as deeeelish.)

1 1/2 tablespoons unrefined sugar
1/2 teaspoon neutral-flavored oil


Muffin mixture:

1 cup whole-grain spelt flour
1 cup oat or barley flour
1/2 cup unsweetened dried, and finely shredded coconut
1/4 cup unrefined sugar (I use coconut palm sugar)
1/4 teaspoon nutmeg
1/4 teaspoon cinnamon
1/4 teaspoon (rounded) sea salt
2 teaspoons baking powder (High Altitude: use only 1 teaspoon)
1/2 teaspoon baking soda (High Altitude: use only 1/4 teaspoon)
3/4 cup mashed, over-ripe banana (1 to 1 1/2 bananas)
3/4 cup plain nondairy milk
1/4 cup pure maple syrup
2 teaspoons apple cider vinegar
1 teaspoon pure vanilla extract
1 1/2 tablespoons soy vanilla yogurt (3 tablespoons neutral-flavored oil, if you are not oil free, yet)


Directions:

Preheat oven to 375.

In a small bowl, combine the topping ingredients, if using, and set aside until the muffin batter is ready.

In a large bowl, combine the dry ingredients, sifting in the baking powder and baking soda. Stir until well mixed.

In another bowl, combine the mashed bananas, milk, maple syrup, vinegar, vanilla, and oil (or soy yogurt!). Add the wet mixture to the dry mixture, and gently fold and stir until well mixed.

If your muffins are oil free, you will need to either have a silicone muffin tin, or, you will need to use paper muffin liners, briefly sprayed with a tiny bit of nonstick spray. (If you don't like nonstick spray, then you could just wait for the muffins to cool quite a bit longer after baking, before you eat them, so that your muffin ingredients don't stick to the paper liners).

Scoop the mixture into a lined muffin pan, filling nine muffin cups (for larger muffins) or eleven or twelve muffin cups (for smaller muffins). If using the topping (I don't) sprinkle a few pinches of it on top of each muffin.

Bake for 18 to 20 minutes (less time for smaller muffins, longer for larger), until toothpick inserted into the center comes out clean.

Remove from oven, let fool for a couple of minutes in the pan, and then transfer the muffins to cool on a cooling rack.


******

This is totally not a kosher question to ask.

But, has anyone tried the Pumpkin Mac yet? Alisa?

We had it again yesterday and I really like it. But it really matters to me whether or not YOU really like it. Or not. I'd love to know...one way or the other.


*****

And, our reduced computer time is going really well. I like it. I don't feel so much pressure to constantly be doing something else. I can be present. With my kids.

Samuel has reduced computer time, too. It is hard for him. He's thrown fits. But you know, I was able to sit down with him and talk about why it was important to do other things. He genuinely cared. His countenance, attitude, and behavior changed. He understands. Once I opened my mouth and talked.

We went to the park. We did laundry. Homework. Dishes. We played. Listened to music. Oh, yeah. My kids really love this song. We danced to it.


Have fun dancing, and have a happy weekend!


Wednesday, October 17, 2012

Cheesy Potato Bar & Easy Pumpkin Molasses Beans


I'm not much of a chips person. Never have been. I am more of a potato person. My family loves chips, so sometimes I serve nachos. But I would much rather have my refried beans on top of chopped romaine lettuce. Not because I know it's healthier, but because I really am not a big chips eater.

I love a good potato. Never get tired of them. Baked, steamed, boiled, sauteed, there are so many ways to eat a potato.

I got caught up in making a fancier version of apple crisp yesterday, and realizing I didn't have a lot of energy left to make dinner, I decided to throw some potatoes in the oven.

They could bake, while I finished the apple crisp.

I am so glad I don't have to rely on dairy cheese to please family and friends. Thank you, basic cheese sauce.

That everyone seems to just love.

I was gonna' make a fancy pumpkin molasses baked beans recipe. There was too much going on. So I opened a can of organic baked beans, instead. Threw in some pumpkin to make it festive. Adjusted the seasonings to taste.


My pictures aren't fancy today.

You know those days where everything around dinner seems to be chaos? Where everyone's needs are suddenly voiced, and there are a million things that need to be taken care of, all at once?

Well, last night was one of those nights. It was busy, but I loved it. My sister loved it. We grew up in a family of seven kids, so a little bitty chaos kinda' feels like home.

Needless to say I was lucky to get a picture. At all. Mom world.

I served up some potatoes for my kids, and poured cheese sauce on top. After fixing up my own plate I looked up. I couldn't believe it.

Their potatoes with cheese had been completely devoured. I had to smile, albeit an inward smile so they couldn't see that I was happy. Children are always suspicious if Mom is happy that they ate something.

It must be healthy.


For the Baked Potato Bar, you will need:

2-3 baked potatoes for each person (I baked about 12 potatoes, but I wish I had baked more. We are pretty good at eating them for leftovers.)
1 Recipe Basic Cheese Sauce

Steamed vegetable, some good options are (pick your favorite(s)):
Broccoli
Zucchini
Peas
Corn
Green beans

Optional Toppings:
Green chili
Tofu Sour Cream
Salsa
Green onions, chopped
Red pepper flakes, if you like it hot


For the Easy Pumpkin Molasses Baked Beans:

1 15 oz can of organic baked beans (check to make sure it is vegan)
1 tbsp ketchup
1 tbsp maple syrup
1/3 cup pumpkin puree

Heat on the stove and mix together well. Serve hot.

******

A trick I learned with baking potatoes.

I used to buy those little pre-cut foil pieces, until I ran out. I didn't use them enough, so I didn't want to buy them again.

I do not like tearing foil. I do not like wasting excess foil. Maybe that's just me.

If you take a large piece of foil, and fold it into fourths, it creates a crease.


Tear along that crease and it will tear evenly. Ta-da! No wasted foil, and perfectly shaped little foil squares.

Wrap your potatoes in the foil squares, and place directly on the middle oven rack. Bake for about 45 minutes at 400 degrees. I used gold potatoes. If they are a larger kind of potatoes, like russet, they may need to bake for longer.

I thought I would go ahead and add the Basic Cheese Sauce recipe here, so you wouldn't have to go to other pages to get it.

A potato bar is another great way to use it.


Simple Cheddar Cheese Sauce
From Neva Brackett's, "Seven Secrets Cookbook."

Note From Ashlee: I've had quite a few taste testers try this cheese sauce. Family and friends have all stated that it tastes exactly like the dairy nacho cheese sauce. Or better. It's ALWAYS been gobbled up. Sometimes I have to go back and make a second batch. Amber has incorporated it into her home, and met with great success. Her kids STILL don't know it's dairy free.

If you follow the directions EXACTLY, you will find yourself with a really good cheese sauce. Best for Mexican types of dishes, but also good on kids' pizza.


Ingredients:

1 cup raw cashew nuts
2 cups water
1/2 large or 1 small red bell pepper, or 1/4 cup canned pimentos or roasted red peppers (I ALWAYS use the jarred, roasted red bell peppers, also called pimentos.)
1 1/2 teaspoons salt
2 teaspoons onion powder
2 tablespoons food yeast flakes (nutritional yeast)
1/2 teaspoon garlic powder

Blend smooth (about 2 minutes) and then bring to a boil, stirring until thick. Use for pizza, lasagna, burritos, etc.

Lite Cheese Option: Use only 1/2 cup cashew nuts plus 1 tablespoon cornstarch.

*Makes 3 Cups*


******

Total side-note.

Remember how we kept trying to get a decent appraisal on our house so we could buy the old cottage with 7 acres across the street? We switched banks, and got a great appraisal. We close with the bank on Friday.

Paul came home from work yesterday and showed me a typed note that had been fixed to the cottage gate.

It was from an "area scout." She wrote that they are filming a movie with Ed Harris and Eva Longoria, and that our cottage was the perfect location. Left her number, and asked that the owner of the cottage would please call her.

So Paul called her. $1,000 dollars a day, they want to give us. To use the property for five days.

I am not even kidding. No joke.

Tuesday, October 16, 2012

Pumpkin Pie Smoothie


How much change is undergone before you can call a recipe your own creation?

My sister and I had a phone conversation about this last night. She is an artist. In art world, a piece of work can be called yours if it has undergone a 30% change, or more.

How do you measure that in food?

When I first tried this pumpkin pie smoothie, I really, really wanted it to work out. There's all this talk about pumpkin pie smoothies.

Well, I don't want to be left out.

I want a yummy piece of pumpkin pie in my smoothie, too. You can say that in a whiny voice, and I will fully support it.

You won't believe my line of thinking. Please don't laugh. Okay, laugh if you want to, as long as I can't hear you. My line of thinking went something like this: How can I make this a green smoothie? I really don't like drinking smoothies without a vegetable in it. Yes, it took me a few minutes to recall that pumpkin, after all, is a vegetable. Genius. Are you sure you want to eat my food after hearing this very sad tale about moi?

All right. Brought myself to attempt said recipe.

Paul is a green smoothie drinkin' monster. Most any green smoothie I give him, even if it's not-so-good, he will drink it. This tall glass of pumpkin-ness, however, sat. Half consumed. I could see him glance at it every once in a while, intermittently throughout his meal. Trying to determine what he thought of it, and figure out a way he could get the rest of this health food concoction into his body. Without having to taste it.

And I stood there, staring at him, staring at his smoothie. Willing him to like it.

Please, please like it.

Realized I could taste my own tall glass of pumpkin-ness to see if it was good or not. I have taste buds, too. Wow. So thick that it is hard to swallow; gives me the sensation that I really should be chewing it.

First taste pumpkin. Then banana. As an aftertaste, spices that make my throat burn. Every time I swallow. These flavors take turns dancing on my tongue.

There is no way. No way I can post something like that on my blog. Or even make reference to it, or add a link to it, if I myself am having difficulties choking it down or having to remind myself it is healthy, and therefore I need to finish it.

I was torn. This recipe had serious potential. I could tell it was a work of art in the making, and I did not want to kick it. I wanted, very badly, to keep it.

Then, I remembered. Oh, yeah. I modify recipes. It's what I do.

Went back to the drawing board, and made my little modifications.


Paul and I went from trying to choke down the smoothie, to trying to figure out how we could scrape every last bit of pie goodness out of the blender. Off of the blender lid. Out of our green smoothie jars.

I might have even licked the rubber spatula.

First taste...pumpkin pie. That's it. And then I want more.


Pumpkin Pie Smoothie
Adapted from Angela Liddon

~2 servings

Note from Ashlee: The changes I made are small, but they made a big difference. The smoothie went from too thick and overpowering, with choppy flavors, to sweet, nicely textured, well-combined flavors. I removed the dried ginger, reduced banana and molasses, incorporated more ice, and added stevia. It wasn't sweet enough without stevia. After making my modifications, and recording them carefully, I made this recipe three more times, with the same great success every time.

Portions of this recipe have to be prepared in advance. An oat/milk/chia seed mixture needs to thicken, and you will need a frozen banana.


Ingredients

2 cups almond milk
1/2 cup rolled oats
2 tbsp chia seeds
1 cup canned pumpkin
1 tsp blackstrap molasses
3/4-1 frozen ripe banana (less is better than more, otherwise it will just taste like banana)
2 tsp cinnamon
1/4 tsp ground nutmeg
15-22 ice cubes (creates better texture, and makes it cold which enhances flavor)
2 tbsp pure maple syrup
3-4 packets of Stevia (don't skip! This makes the smoothie sweet without adding sugar!)
Coconut Whipped Cream, for garnish


Instructions

1. In a medium-sized bowl whisk together the milk, oats, and chia seeds. Place in fridge for 1 hour or preferably overnight.

2. Add soaked oat mixture to blender along with the pumpkin, molasses, frozen banana, stevia, spices, ice and maple syrup. In other words, just throw everything in your blender all at once.

3. Blend until smooth. Add additional ice cubes to achieve a smoothie-like texture. It should not be so thick that it looks/feels like pudding. Blend until ice cold. (If you don't have a high powered blender, you may need to layer your ice in the blender first. Or use less ice. I would start out with 8-12 cubes, blend, and then add more from there. The additional ice is what changed the texture and made it drinkable, instead of being so thick. I would hesitate to reduce the ice cubes.) It takes three full cycles on my powerful blendtec to get this smoothie completely smooth -- there should be no grittiness. So blend the tarnation out of it.


4. Serve with Coconut Whipped Cream and a sprinkle of cinnamon on top! (I don't do this because I am too lazy, and find that the smoothie is great without it.)


Some things you should know about this recipe:

It's one of those "you have to prepare the night before" things. Or at least let it sit for an hour or so.

I know.

I am not an overnight prep girl, myself. I don't do overnight lasagna, overnight breakfast casseroles. Any of that stuff. And I have to tell you that I was frustrated.

I wanted my smoothie. NOW.

But I went ahead and made the prep ingredients, and then put it in the fridge. Later the same day, I made my smoothie. Right after finishing it, I made another batch of prep ingredients for overnight.


Now, it's a habit. I make the prep part right after blending the previous nights' concoction. Ready for tomorrow!

And.

It requires frozen bananas. I would not use a banana that has not been frozen.

Here is what I do. After being addicted to banana ice cream all summer, and then needing bananas for my favorite muffin recipe, I learned to buy a lot of bananas.

Every week when I go to Costco, I buy 4-6 bunches of bananas. At $1.29 per bunch, this amounts to about $6-$8 a week. Totally affordable. The kids and I eat through as many as we can over the course of the week, while the rest sit on the counter to sweeten.


When they are speckled brown, I grab my kids and we have a banana party. They coin bananas and put them in freezer Ziploc baggies, while I clean the kitchen.


Sometimes we eat the bananas. I have no complaints. Dr. Atkins, if alive, probably would, though.

They store very well, lying flat in my freezer, inside freezer-Ziploc gallon bags, available for banana ice cream.

Also available for a great Pumpkin Pie smoothie. I can't remember the last time we threw away an old banana in the trash. They are too precious around here.

Lastly, oats and pumpkin are some of the highest fiber foods. Sorry, Metamucil. I'll put you out of business.

Happy Autumn!!